
Have you ever wondered how those lovely, lasting curls from days gone by were made? Perhaps you've seen pictures of movie stars or even your grandmother with hair that just seemed to hold its shape perfectly. Well, there's a charming, almost timeless secret to that kind of enduring style, and it's called pin curls. This simple yet powerful technique has been a cornerstone of beautiful hair for ages, offering a way to get gorgeous, bouncy hair that really sticks around. It's a method that, frankly, many people are rediscovering today for its amazing results.
For anyone hoping to make their curls or waves live past the first day, pin curls offer a simple, very effective hack. They are an easy way to create long-lasting, bouncy curls that will truly last all day long! Whether you're aiming for soft waves that gently frame your face or perhaps those tight, neat ringlets that really stand out, pin curls are a fantastic option. They give you so much versatility in how your hair turns out, which is pretty neat.
This method has quite a history, too. Pin curls were, you know, the basis of many different classic styles, stretching from the 18th century all the way up to the 1960s. The mid-1930s through the 1950s was a particularly distinctive time in hairstyling, in which most women, apparently, utilized pin curls for their main hair curling technique. It's truly amazing how a technique can stay so relevant through so many decades, isn't it?
Table of Contents
- What Are Pin Curls?
- A Glimpse into the Past: The History of Pin Curls
- Getting Ready: Your Pin Curl Essentials
- The Step-by-Step Guide to Creating Pin Curls
- Waking Up to Beautiful Curls
- Pin Curls for Natural Hair
- Common Questions About Pin Curls
- Your Lasting Curl Solution
What Are Pin Curls?
As the name implies, pin curls are a hairstyling technique where the hair is, you know, pinned down. This pinning can be either flat against the head or slightly elevated, all in the shape of a curl. This style is created by curling small sections of hair into tight formations, which are then held in place with a pin. It's a very simple concept, but the results are really quite impressive.
It's a way to set your hair without needing heat from tools like curling irons, which can be pretty harsh on your strands over time. Instead, you're relying on the hair drying in a curled position, which then, you know, remembers that shape. This makes them a very gentle option for anyone concerned about keeping their hair healthy and strong. So, in a way, it's a bit of a hair-friendly choice.
The beauty of pin curls lies in their ability to create a variety of curl patterns, from soft, flowing waves to tightly coiled ringlets. It all depends on how you roll and pin each section. You can, for instance, make the curls tighter for more bounce or looser for a softer look. This flexibility is really one of their best features, actually.
A Glimpse into the Past: The History of Pin Curls
Pin curls have a truly fascinating past, which is rather interesting. Their beginnings are rooted deeply in the history of hairstyling, showing up in different forms for centuries. As we mentioned, they were the basis of many different classic styles, from the 18th century all the way up to the 1960s. That's a long run for any hair technique, isn't it?
During the mid-1930s through the 1950s, pin curls really had their moment in the sun. This was a distinctive time in hairstyling where most women, it seems, utilized pin curls for their main hair curling technique. Think of all those iconic looks from Hollywood's Golden Age – many of them, apparently, owed their existence to the humble pin curl. It's pretty cool to think about how something so simple could be so influential.
The enduring popularity of pin curls speaks to their effectiveness and versatility. They offered women a reliable way to achieve glamorous, well-groomed hair without relying on complex salon visits every day. This was a practical solution for daily beauty, and that practicality, you know, still holds true today. It’s a testament to how some things just work, plain and simple.
Getting Ready: Your Pin Curl Essentials
To get the best pin curls ever, you'll need to start by gathering the necessary tools. This isn't a technique that requires a ton of fancy gadgets, which is nice, but having the right basics makes all the difference. You'll want to make sure you have everything ready before you begin, just to make things easier, you know?
First off, you'll need some bobby pins or small hair clips. These are, basically, what hold your curls in place as they set. The more pins you have, the better, as you'll be using quite a few. Also, a good comb, preferably a fine-toothed one, will help you section your hair neatly. This is pretty important for getting even curls.
Then, there's the product side of things. To create pin curls, you start by wetting your hair and applying a little hairspray or setting lotion. This is, you know, really important because it will help your curls hold their shape. A spray bottle with water is also super handy for dampening sections as you go. Having these things ready makes the whole process so much smoother, really.
The Step-by-Step Guide to Creating Pin Curls
Now for the fun part: actually making the pin curls! This process is pretty straightforward once you get the hang of it, and it's something you can totally do yourself at home. Just take your time, and you'll be creating beautiful, lasting curls in no time, you know?
Preparing Your Hair
To begin, your hair needs to be just right. As mentioned, you start by wetting your hair. It doesn't need to be soaking wet, just damp enough so it's pliable and can easily be shaped. A spray bottle filled with water works perfectly for this, allowing you to control the dampness. You want it to be, like, slightly moist, not dripping.
After dampening, apply a little hairspray or setting lotion throughout your hair. This product is your secret weapon for making sure those curls really last. It provides the hold and structure your hair needs to set properly. Just a small amount will do, distributed evenly, so your hair feels a bit tacky but not stiff, you know?
Some people prefer to do this on freshly washed hair that's been towel-dried, while others find that second-day hair works well too. The key is that it's clean enough to style and damp enough to mold. This initial prep really sets the stage for success, so take your time with it, really.
Sectioning and Curling
Okay, so once your hair is prepped, it's time to start sectioning. You'll want to work with small sections of hair for each curl. The size of the section will, basically, determine the size of your curl. Smaller sections mean tighter curls, and larger sections give you softer waves. It's pretty simple, actually.
Then, starting at the front of your head, wrap a small section of hair around your finger. You can use one or two fingers, depending on how big you want the curl to be. The idea is to create a neat, uniform coil. This is where the "curling small sections of hair into tight" formations comes into play, as mentioned in my text.
Once you've wrapped the hair into a neat coil, gently slide it off your finger, keeping its shape intact. It should look like a little spiral. This takes a tiny bit of practice, but you'll get it quickly. Remember, the tighter and neater the coil, the more defined your curl will be. So, try to keep it snug.
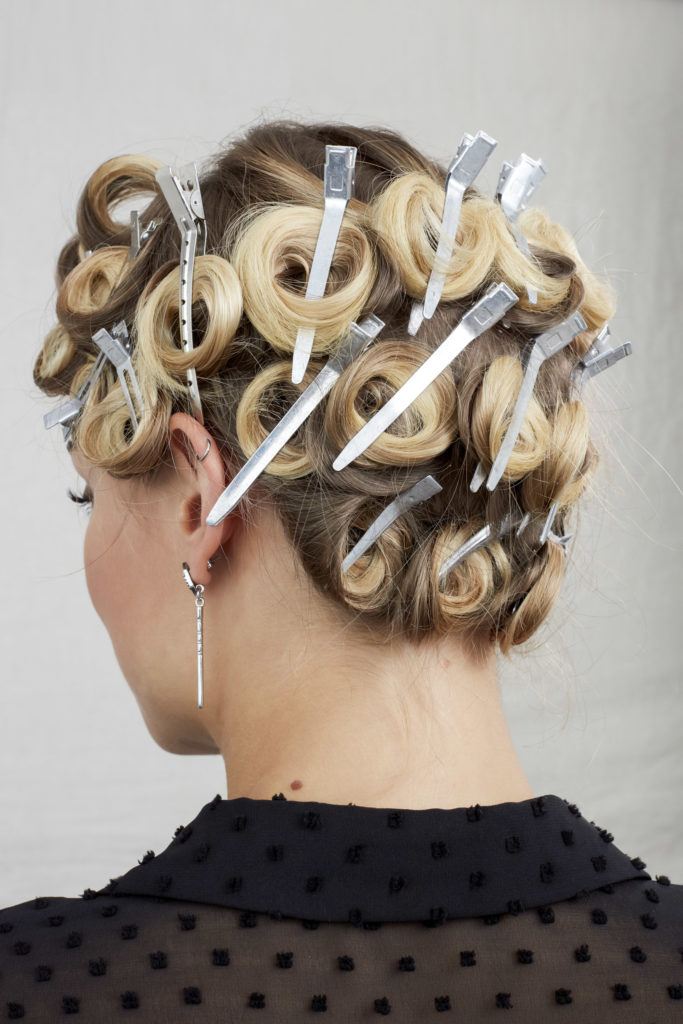
Securing Your Curls
Now that you have your perfectly coiled section of hair, it's time to secure it. This is where your bobby pins or clips come in handy. As the name implies, pin curls are a hairstyling technique where the hair is, you know, pinned down. You'll take your pin and carefully secure the coil flat against your scalp. The goal is to keep the curl from unraveling as it dries.
Make sure the pin goes through the center of the curl and into the hair underneath, holding it firmly but gently. You don't want to distort the curl's shape, just keep it in place. Some people like to use two pins in an "X" shape for extra security, which is pretty clever. You'll repeat this process all over your head, working systematically.
You can choose to pin the curls flat against your head for a softer wave or stand them up for more volume at the roots. This choice depends on the final look you're going for. Just keep going until all your hair is neatly coiled and pinned. It might look a bit funny at this stage, but trust the process, you know?
The Drying and Setting Process
Once all your pin curls are in place, the most important part begins: letting them dry completely. This is, you know, absolutely crucial for the curls to set and last. You can allow your hair to air dry, which might take several hours depending on your hair's thickness and the humidity in the air. Patience is a virtue here, honestly.
Alternatively, you can use a hooded dryer on a low-heat setting to speed up the process. This is a good option if you're in a bit of a hurry. Just make sure your hair is completely, totally dry before you even think about taking out those pins. If it's even slightly damp, your curls won't hold, and that would be a bit of a bummer, wouldn't it?
Many people find it convenient to put these in pin curls your hair at night before bed. This way, your hair can dry thoroughly overnight while you sleep. It's a fantastic time-saver, and you wake up to perfectly set hair. This overnight method is, frankly, one of the most popular ways to do it.
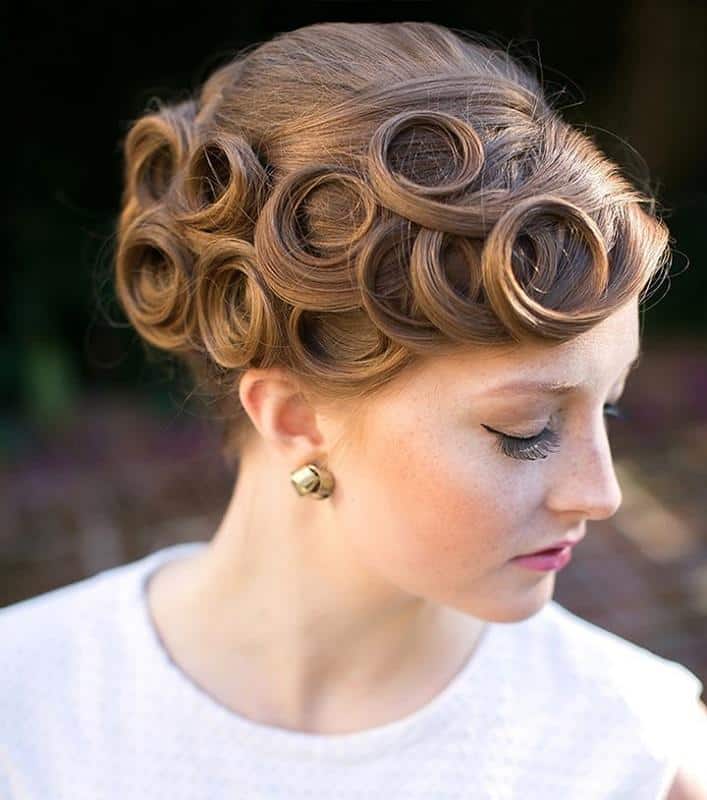
Waking Up to Beautiful Curls
The next morning, or once your hair is completely dry, it's time for the big reveal! Gently remove each pin, being careful not to pull or disturb the curl too much. You'll see these lovely, perfectly formed coils. It's a pretty satisfying sight, actually, seeing all your hard work pay off.
Once all the pins are out, you can, you know, brush it. This is where you transform those tight coils into the soft waves or bouncy curls you desire. You can use a wide-tooth comb for a more defined look or a soft brush for a softer, more blended style. Brushing it out helps to meld the individual curls into a cohesive, beautiful hairstyle.
You can also use your fingers to gently separate the curls for a more natural, lived-in look. A little hairspray can be applied to finish and hold the style in place all day long. This step is key to getting your curly hairstyles to live past the first day with a simple hack. It’s amazing how well they hold, too.
Pin Curls for Natural Hair
Pin curls offer an elegant method for styling natural hair, providing definition and bounce without the need for heat. This is a huge plus for anyone trying to maintain hair health and avoid damage. They are a wonderful alternative to heat styling, allowing your natural texture to shine through in a beautiful, curled form. It's a very kind way to style your hair, you know?
For natural hair, making sure your hair is properly moisturized before applying the setting lotion is, you know, really important. This helps prevent frizz and ensures the curls are soft and shiny. You might find that a slightly heavier setting lotion works better for natural textures to really lock in the curl. Experiment a little to see what works best for your hair type, which is always a good idea.
Through this tutorial, you’ve learned not only the basic steps but also how to avoid common mistakes in pin curling. For instance, making sure your sections are consistently sized and that your curls are pinned securely are key. With a little practice, pin curls can become a staple in your natural hair styling routine, giving you consistently beautiful results. Learn more about natural hair care on our site, and check out this page for more styling tips.
Common Questions About Pin Curls
People often have a few questions about pin curls, especially when they're first starting out. Let's go over some of the most common ones, which is pretty helpful, you know?
How long do pin curls typically last?
Pin curls are known for their staying power. When done correctly, with proper setting lotion and thorough drying, they can last all day, and sometimes even into the next day. Many people find their curls hold up for a couple of days, especially if they protect their hair at night. It's pretty impressive, actually.
Can you sleep in pin curls?
Absolutely! In fact, sleeping in pin curls is a very popular method. You can put these in pin curls your hair at night before bed, and in the morning, brush it out for beautiful, ready-to-go hair. Just make sure your curls are completely dry before you lay down to avoid flattening them or causing frizz. A silk scarf or bonnet can also help protect them overnight, which is a good tip.
What kind of hair works best for pin curls?
Pin curls can work on almost any hair type, from straight to wavy to curly, and even on different lengths. The key is adjusting the size of your sections and the amount of setting product. They are particularly wonderful for fine hair that struggles to hold a curl, as the setting process really helps. They also offer an elegant method for styling natural hair, as we discussed. So, in a way, they're pretty versatile.
Your Lasting Curl Solution
Pin curls are a truly timeless technique that continues to deliver beautiful, lasting results. They offer a gentle, effective way to achieve everything from soft waves to tight ringlets, all without the need for harsh heat. From their historical significance in creating classic looks of the past to their relevance for today's beauty enthusiasts, pin curls remain a go-to method for gorgeous hair. It's a simple hack that really works, you know?
By following the steps outlined here, you can easily learn how to create pin curls on your hair. Remember to gather your tools, prepare your hair with a little hairspray or setting lotion, and give your curls plenty of time to dry completely. With a bit of practice, you'll be able to create those long-lasting, bouncy curls that will last all day long! For more insights into classic beauty techniques, you might want to check out this resource on vintage hairstyling.
So, why not give pin curls a try? You might just discover your new favorite way to get those perfect, enduring curls you've always admired. It's a method that has stood the test of time for a very good reason, and it's surprisingly simple to master. You can, you know, absolutely do this.

Detail Author:
- Name : Hertha Barton
- Username : zmuller
- Email : mae98@hotmail.com
- Birthdate : 1987-07-05
- Address : 62691 Retha Fort Marcosstad, ME 41795
- Phone : 407.644.2897
- Company : Kuhlman PLC
- Job : Interpreter OR Translator
- Bio : Rerum harum cum consectetur facere magnam a. Veniam minima sed molestiae aut et voluptatem. Nihil totam quaerat nihil ab quasi rerum sit et. Quidem omnis eum officia in aut aliquid.
Socials
linkedin:
- url : https://linkedin.com/in/lacy_official
- username : lacy_official
- bio : Id quam eligendi quasi possimus.
- followers : 2570
- following : 2116
facebook:
- url : https://facebook.com/lacy_corkery
- username : lacy_corkery
- bio : Vel blanditiis nihil magnam aut. Omnis incidunt praesentium fugit corrupti.
- followers : 2682
- following : 1847
instagram:
- url : https://instagram.com/lacy_dev
- username : lacy_dev
- bio : Maiores repellat ipsa impedit ipsum placeat. Quia esse labore quo reprehenderit.
- followers : 3748
- following : 2310
