
Imagine a moment when every second truly counts, when a person's well-being hangs by a thread, you know? It's a scary thought, but knowing what to do in such a situation can make all the difference. When severe bleeding happens, sometimes very suddenly, having the ability to act quickly and correctly, perhaps by tying a tourniquet, is a skill that could save a life. This isn't just about simple first aid; it's about stepping up when it really matters, you see.
We often think about tying in many different ways, don't we? So, a common symbol in modern weddings, for instance, is the image of a knot, suggesting a lasting bond. And the phrase "tie the knot" as a euphemism for marriage is also commonly recognized, you know. But there's a very different, very serious kind of tying that can make all the difference when someone is in real trouble: tying a tourniquet. It's a way to secure something vital, much like how one might seek a particular word or phrase that means to "tie back to" a concept, but with a more fitting sound for a serious situation. Here, the "tying" is about stopping a flow that shouldn't be happening.
This skill, the proper method for tying a tourniquet, is something anyone can learn, and it's something that, honestly, everyone should probably know. It's a straightforward process, but getting it right is absolutely key. We'll talk about what it is, when you might need it, and precisely how to go about it, step by careful step. So, let's get into the details of this truly important technique, something that can help keep someone safe until professional help arrives, more or less.
Table of Contents
- What is a Tourniquet and When Do You Need One?
- Understanding the Urgency of Severe Bleeding
- Commercial vs. Improvised Tourniquets
- Step-by-Step: Tying a Tourniquet Properly
- Common Mistakes to Avoid When Tying a Tourniquet
- Important Considerations After Application
- Myths and Facts About Tourniquets
- Practice Makes Perfect: Why Training Matters
- Frequently Asked Questions About Tying a Tourniquet
- Taking Action: Your Role in an Emergency
What is a Tourniquet and When Do You Need One?
A tourniquet is, at its core, a device used to stop the flow of blood, typically in an arm or a leg, you know? It's a band that you wrap around a limb and then tighten, applying pressure to the blood vessels underneath. This pressure then closes off the vessels, halting the bleeding from a wound further down the limb. It's a pretty simple idea, but its impact can be incredibly profound in a dire situation.
You might need to consider tying a tourniquet when someone has a life-threatening bleed from an arm or a leg, and other methods, like direct pressure, just aren't doing enough to stop it. This kind of bleeding, where blood is spurting or pooling rapidly, can lead to serious trouble very quickly. It's a last resort measure, yes, but it's a vital one when the stakes are so high. Think of it as a way to buy precious time until professional medical help can take over, more or less.
So, when would this come into play? Well, imagine a severe accident, perhaps a deep cut from machinery, or maybe an injury where a limb is crushed. In these moments, the amount of blood a person can lose is quite shocking, and very dangerous. A tourniquet acts as a temporary stopper, allowing the person to keep enough blood to stay stable. It's a pretty powerful tool for immediate care, honestly, and it can be the difference between life and something much worse.
Understanding the Urgency of Severe Bleeding
Serious bleeding, the kind that might call for tying a tourniquet, is an urgent matter, you know? When a major artery or vein is cut, blood can leave the body at an alarming rate. This rapid loss of blood can quickly lead to shock, where the body doesn't get enough blood flow to its vital organs. If not stopped, this can very quickly become a situation where survival is at risk, you see.
The human body, it turns out, has only so much blood to spare. Losing a significant portion, even a liter or so, can cause the heart to struggle, and the brain and other organs to start shutting down. That's why acting fast, and acting effectively, is so incredibly important when faced with severe bleeding. It's about preserving what's left, and giving the body a chance to recover, more or less.
When you see blood spurting, or soaking through bandages almost immediately, that's a clear sign of a very serious problem. This isn't the kind of cut you can just put a small bandage on. This is the moment where you might consider a tourniquet, and knowing how to apply one properly, how to go about tying a tourniquet, becomes a truly life-saving skill. It's about recognizing the gravity of the situation and having a plan, you know?
Commercial vs. Improvised Tourniquets
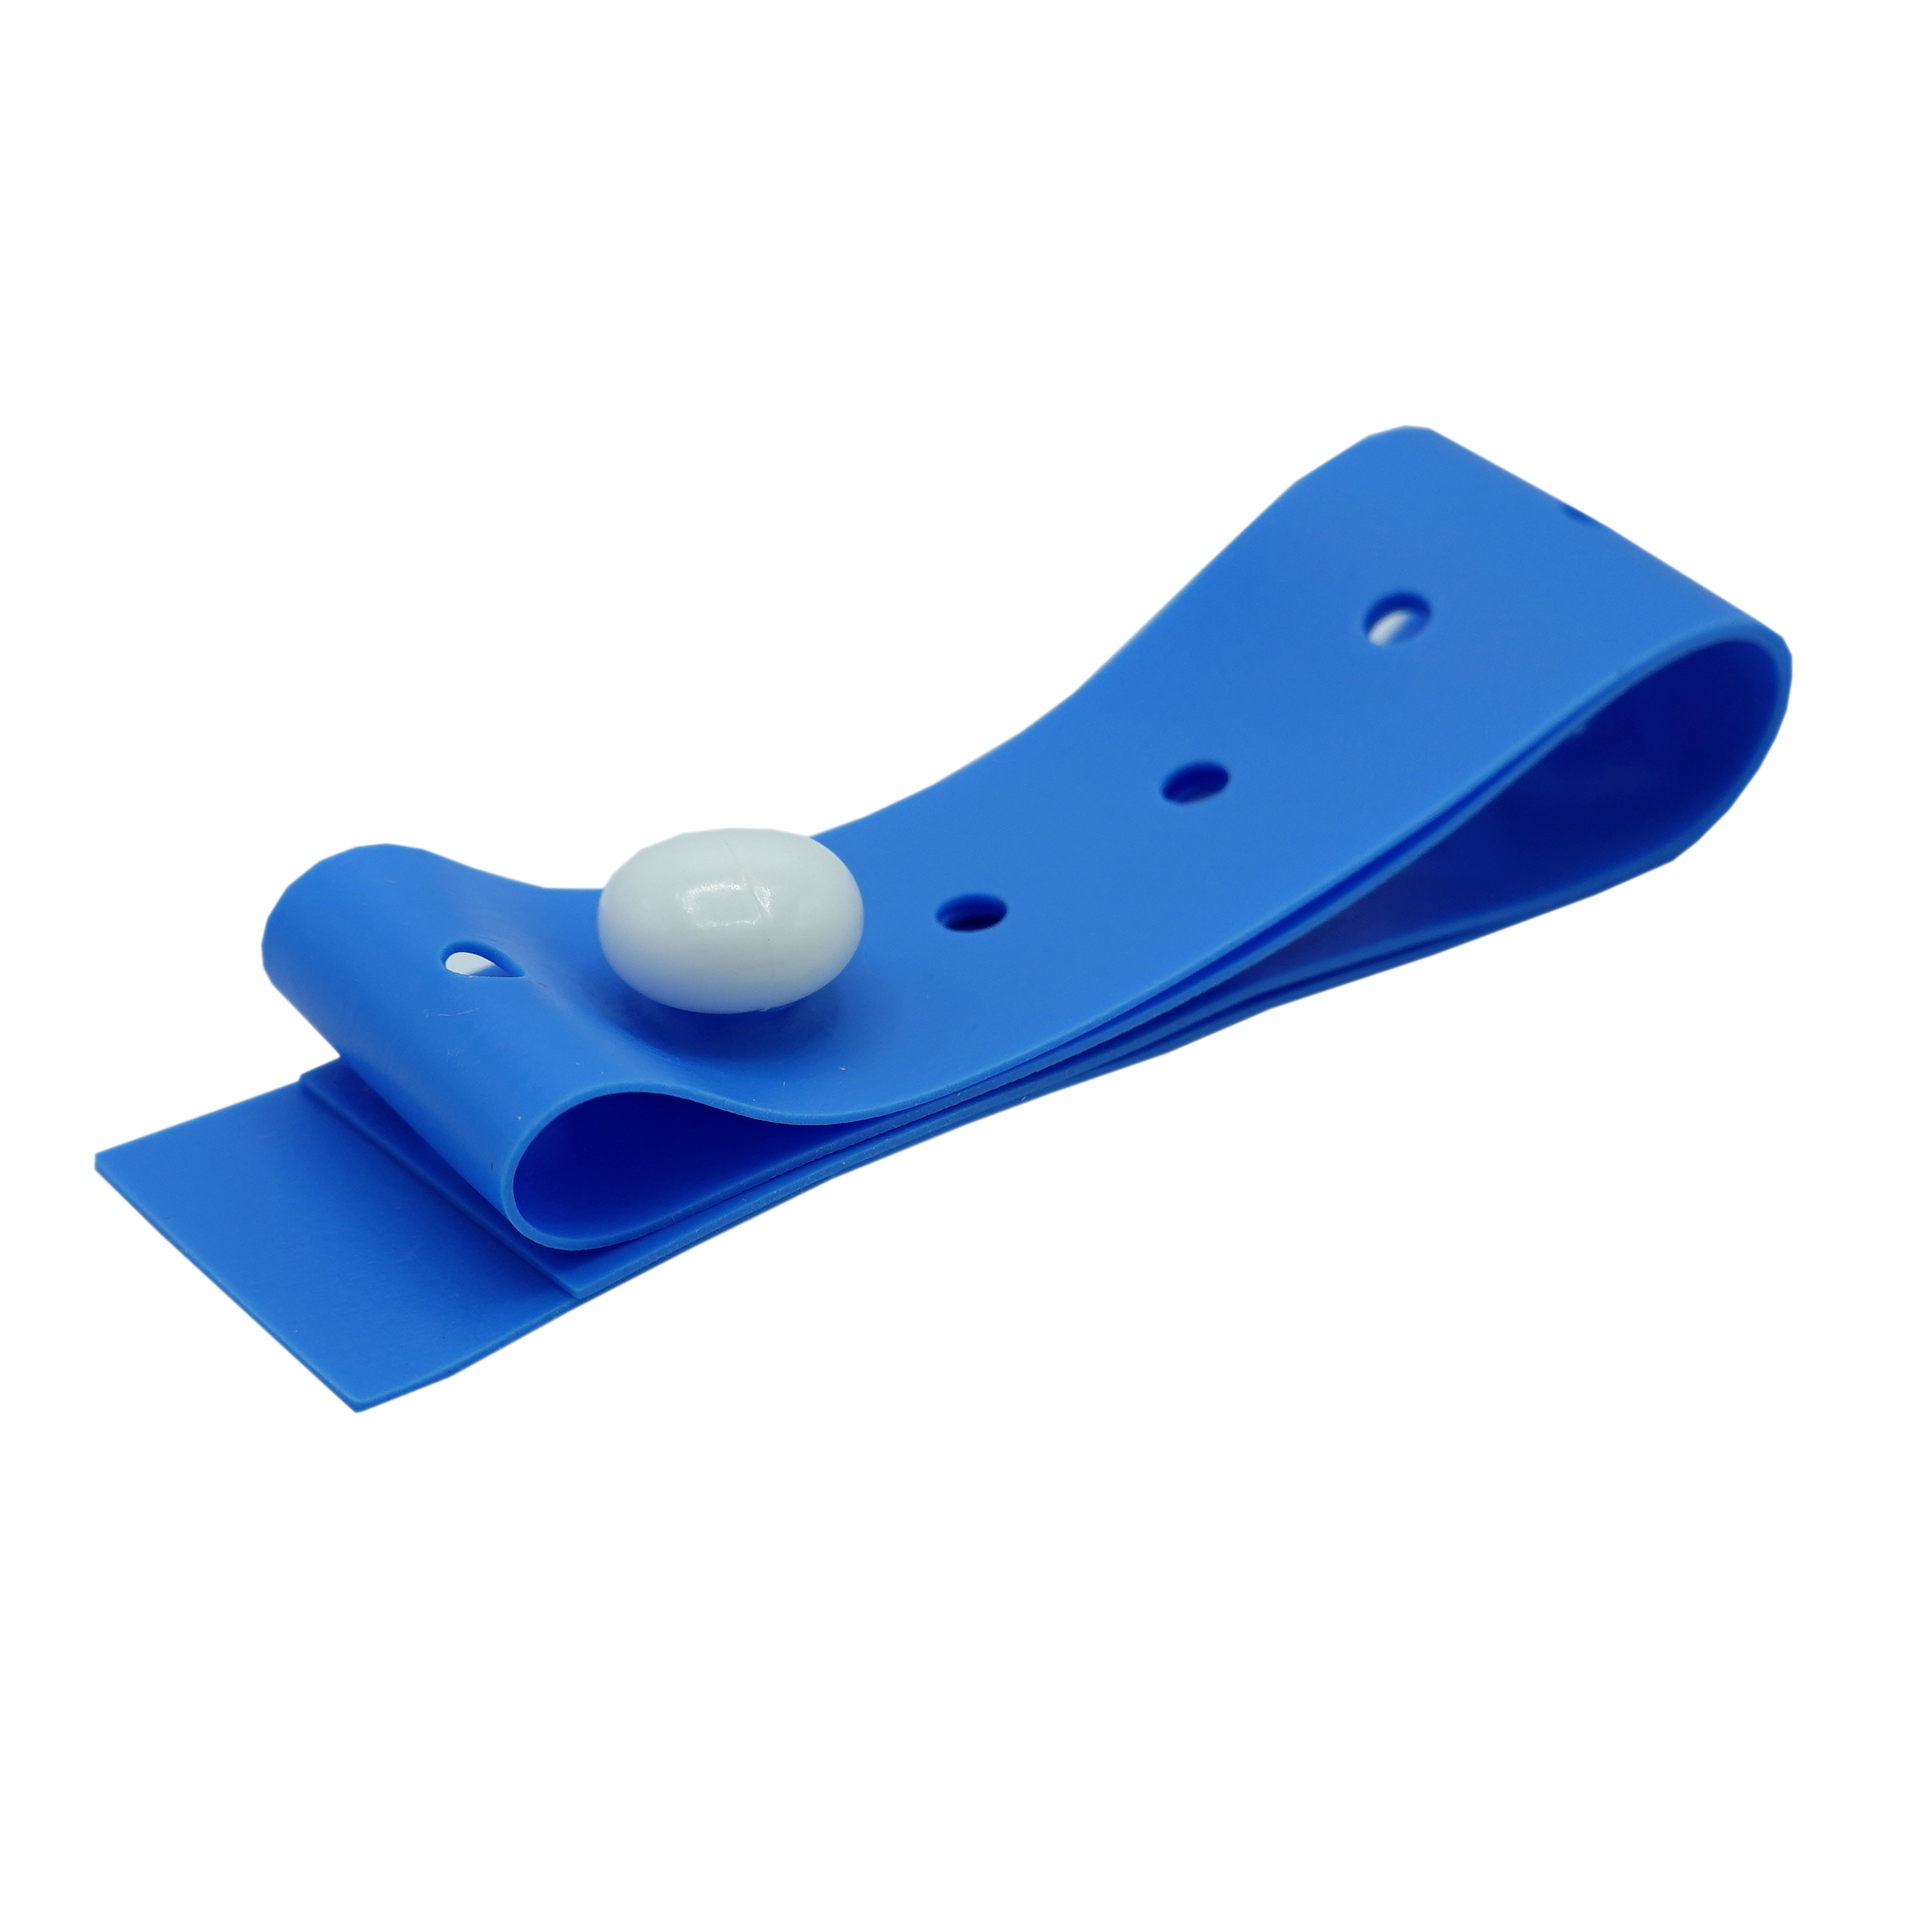
When it comes to tourniquets, you generally have two main types: commercial ones, which are made specifically for this purpose, and improvised ones, which you might create from materials you have on hand. Commercial tourniquets, like the CAT (Combat Application Tourniquet) or SOF-T, are designed for quick and effective application. They often have a windlass rod, a strong strap, and a clip or buckle to secure it. These are, honestly, the best choice if you have one available, as they are built for the job, you know?
However, emergencies don't always happen when you have specialized gear ready. This is where an improvised tourniquet comes in. It's about using what's around you to achieve the same goal: stopping the blood flow. This could be a scarf, a piece of clothing, or even a strong belt. The idea is to find something that can be wrapped around the limb and then tightened with some kind of stick or rod to create the necessary pressure. It's about making do, in a way, but doing it correctly is what counts.
The success of an improvised tourniquet, very much like how one might think about patterns or specific methods for tying different kinds of knots, depends on choosing the right materials and applying them with precision. It's not just any piece of fabric; it needs to be strong enough not to break and wide enough not to cut into the skin too much. So, understanding what works and what doesn't is a pretty big part of being ready for an unexpected situation, you know?
What Makes a Good Improvised Tourniquet?
For an improvised tourniquet to work well, you need a few key things. First, you need a strong, wide material for the band. Something like a folded triangular bandage, a wide piece of cloth from a shirt, or a sturdy belt can work. It should be at least one to two inches wide to avoid causing more damage by cutting into the skin. A narrow rope or wire, for example, is a very bad idea, as it could injure the limb even more.
Second, you need a "windlass," which is a stick-like object that you can twist to tighten the band. This could be a sturdy pen, a small wrench, a stick, or even a strong piece of cutlery. It needs to be something that won't break when you apply significant force. This is the part that allows you to get enough pressure to actually stop the bleeding, you see.
Third, you need a way to secure the windlass once it's tightened. This could be by tying the ends of the band around it, or by using another piece of tape or fabric to hold it in place. The whole setup needs to stay tight, otherwise, it won't be doing its job. It's a bit like trying to tie together two things that have previously been talked about, making sure they are firmly connected and won't come apart, you know?
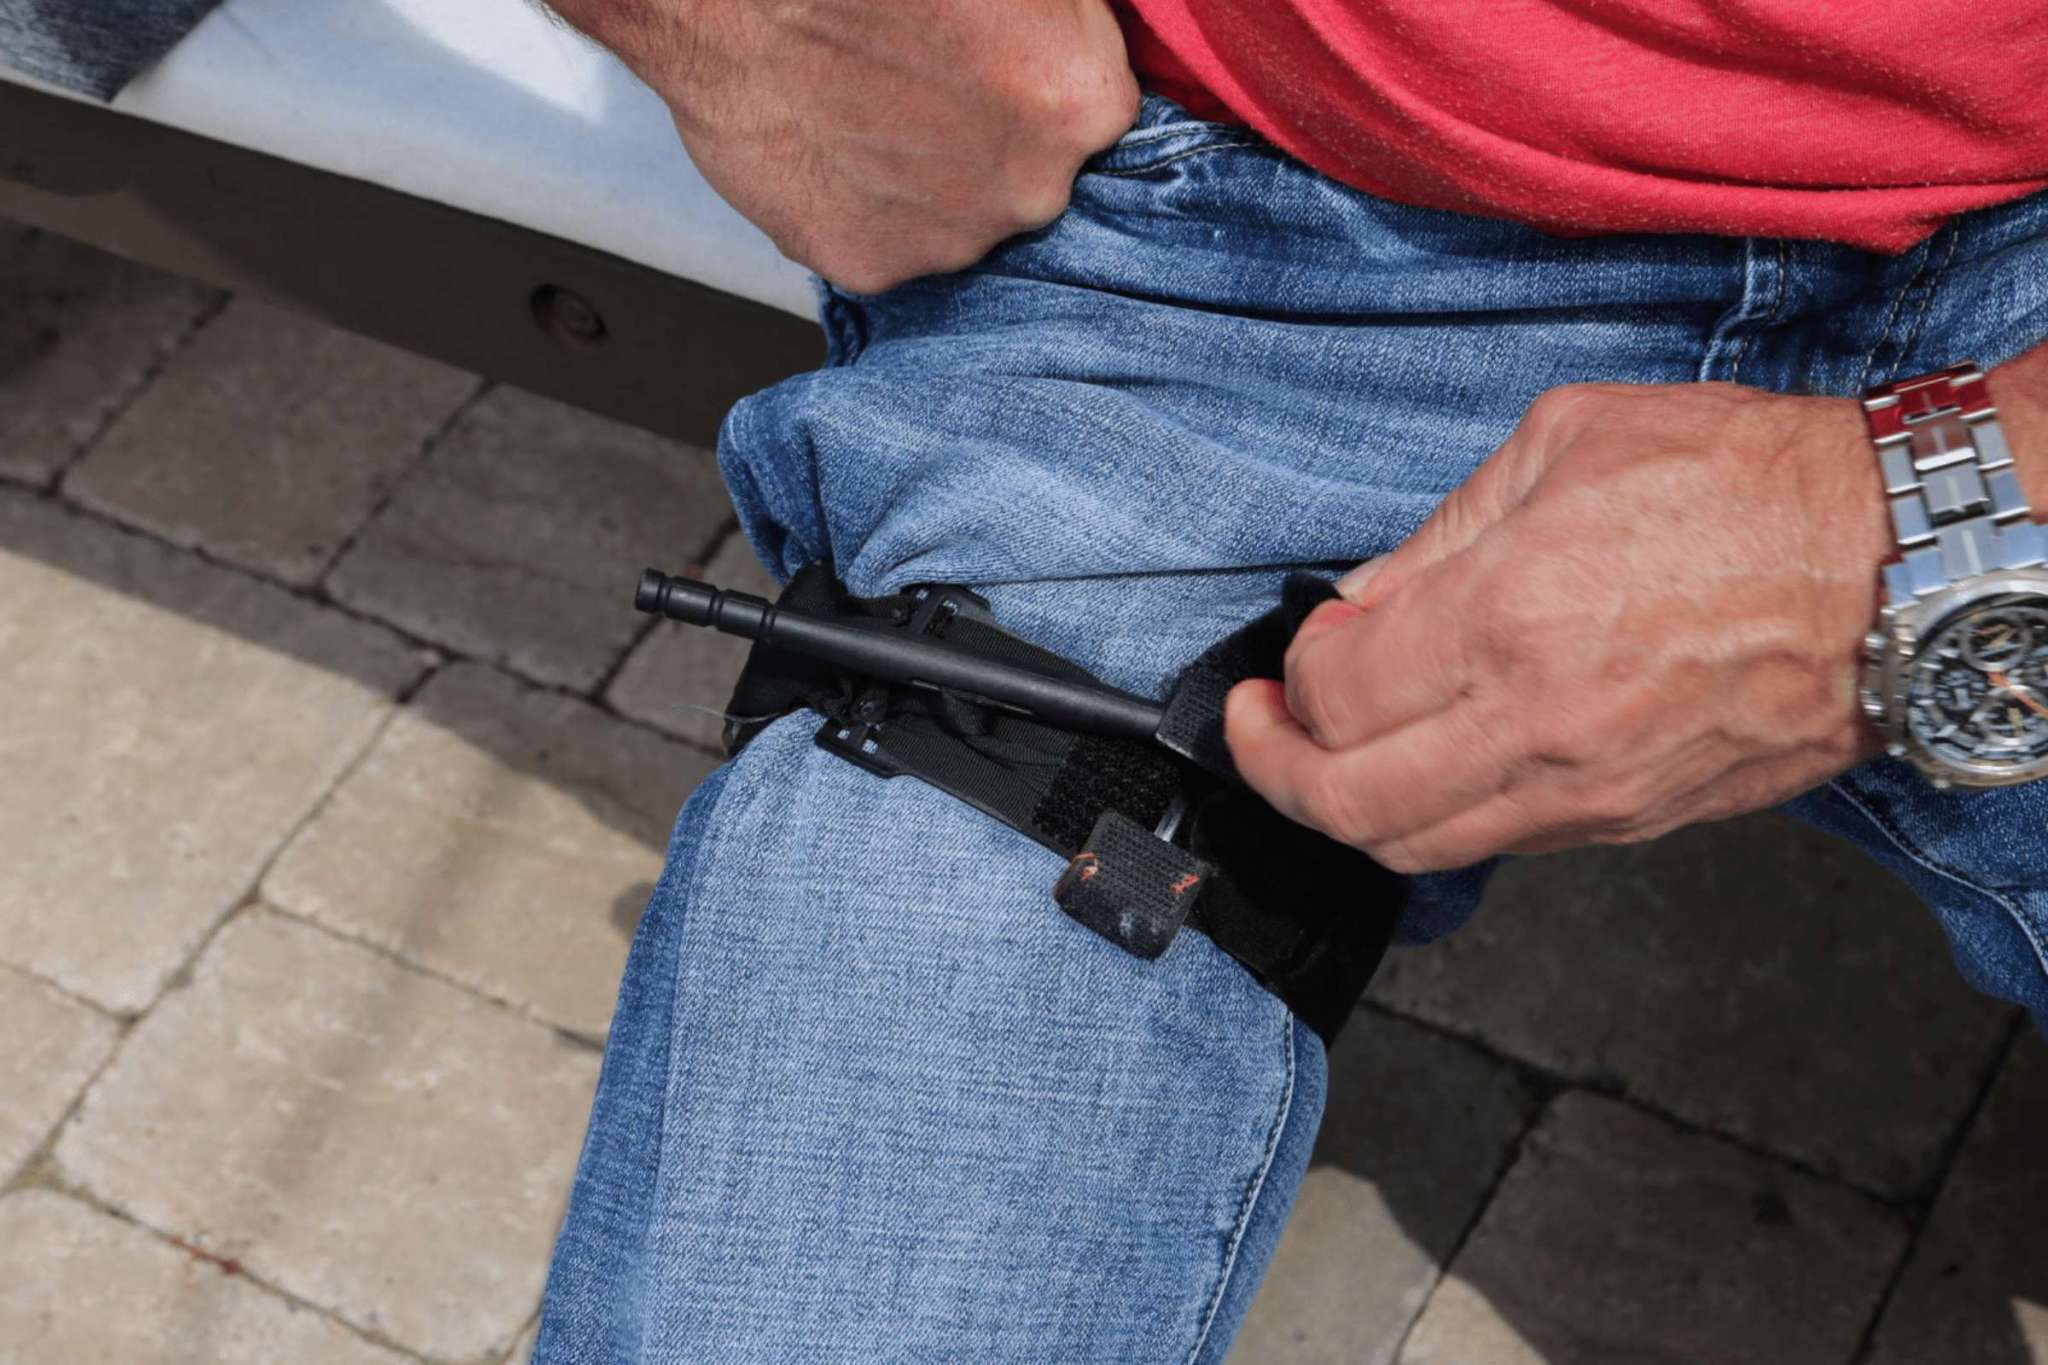
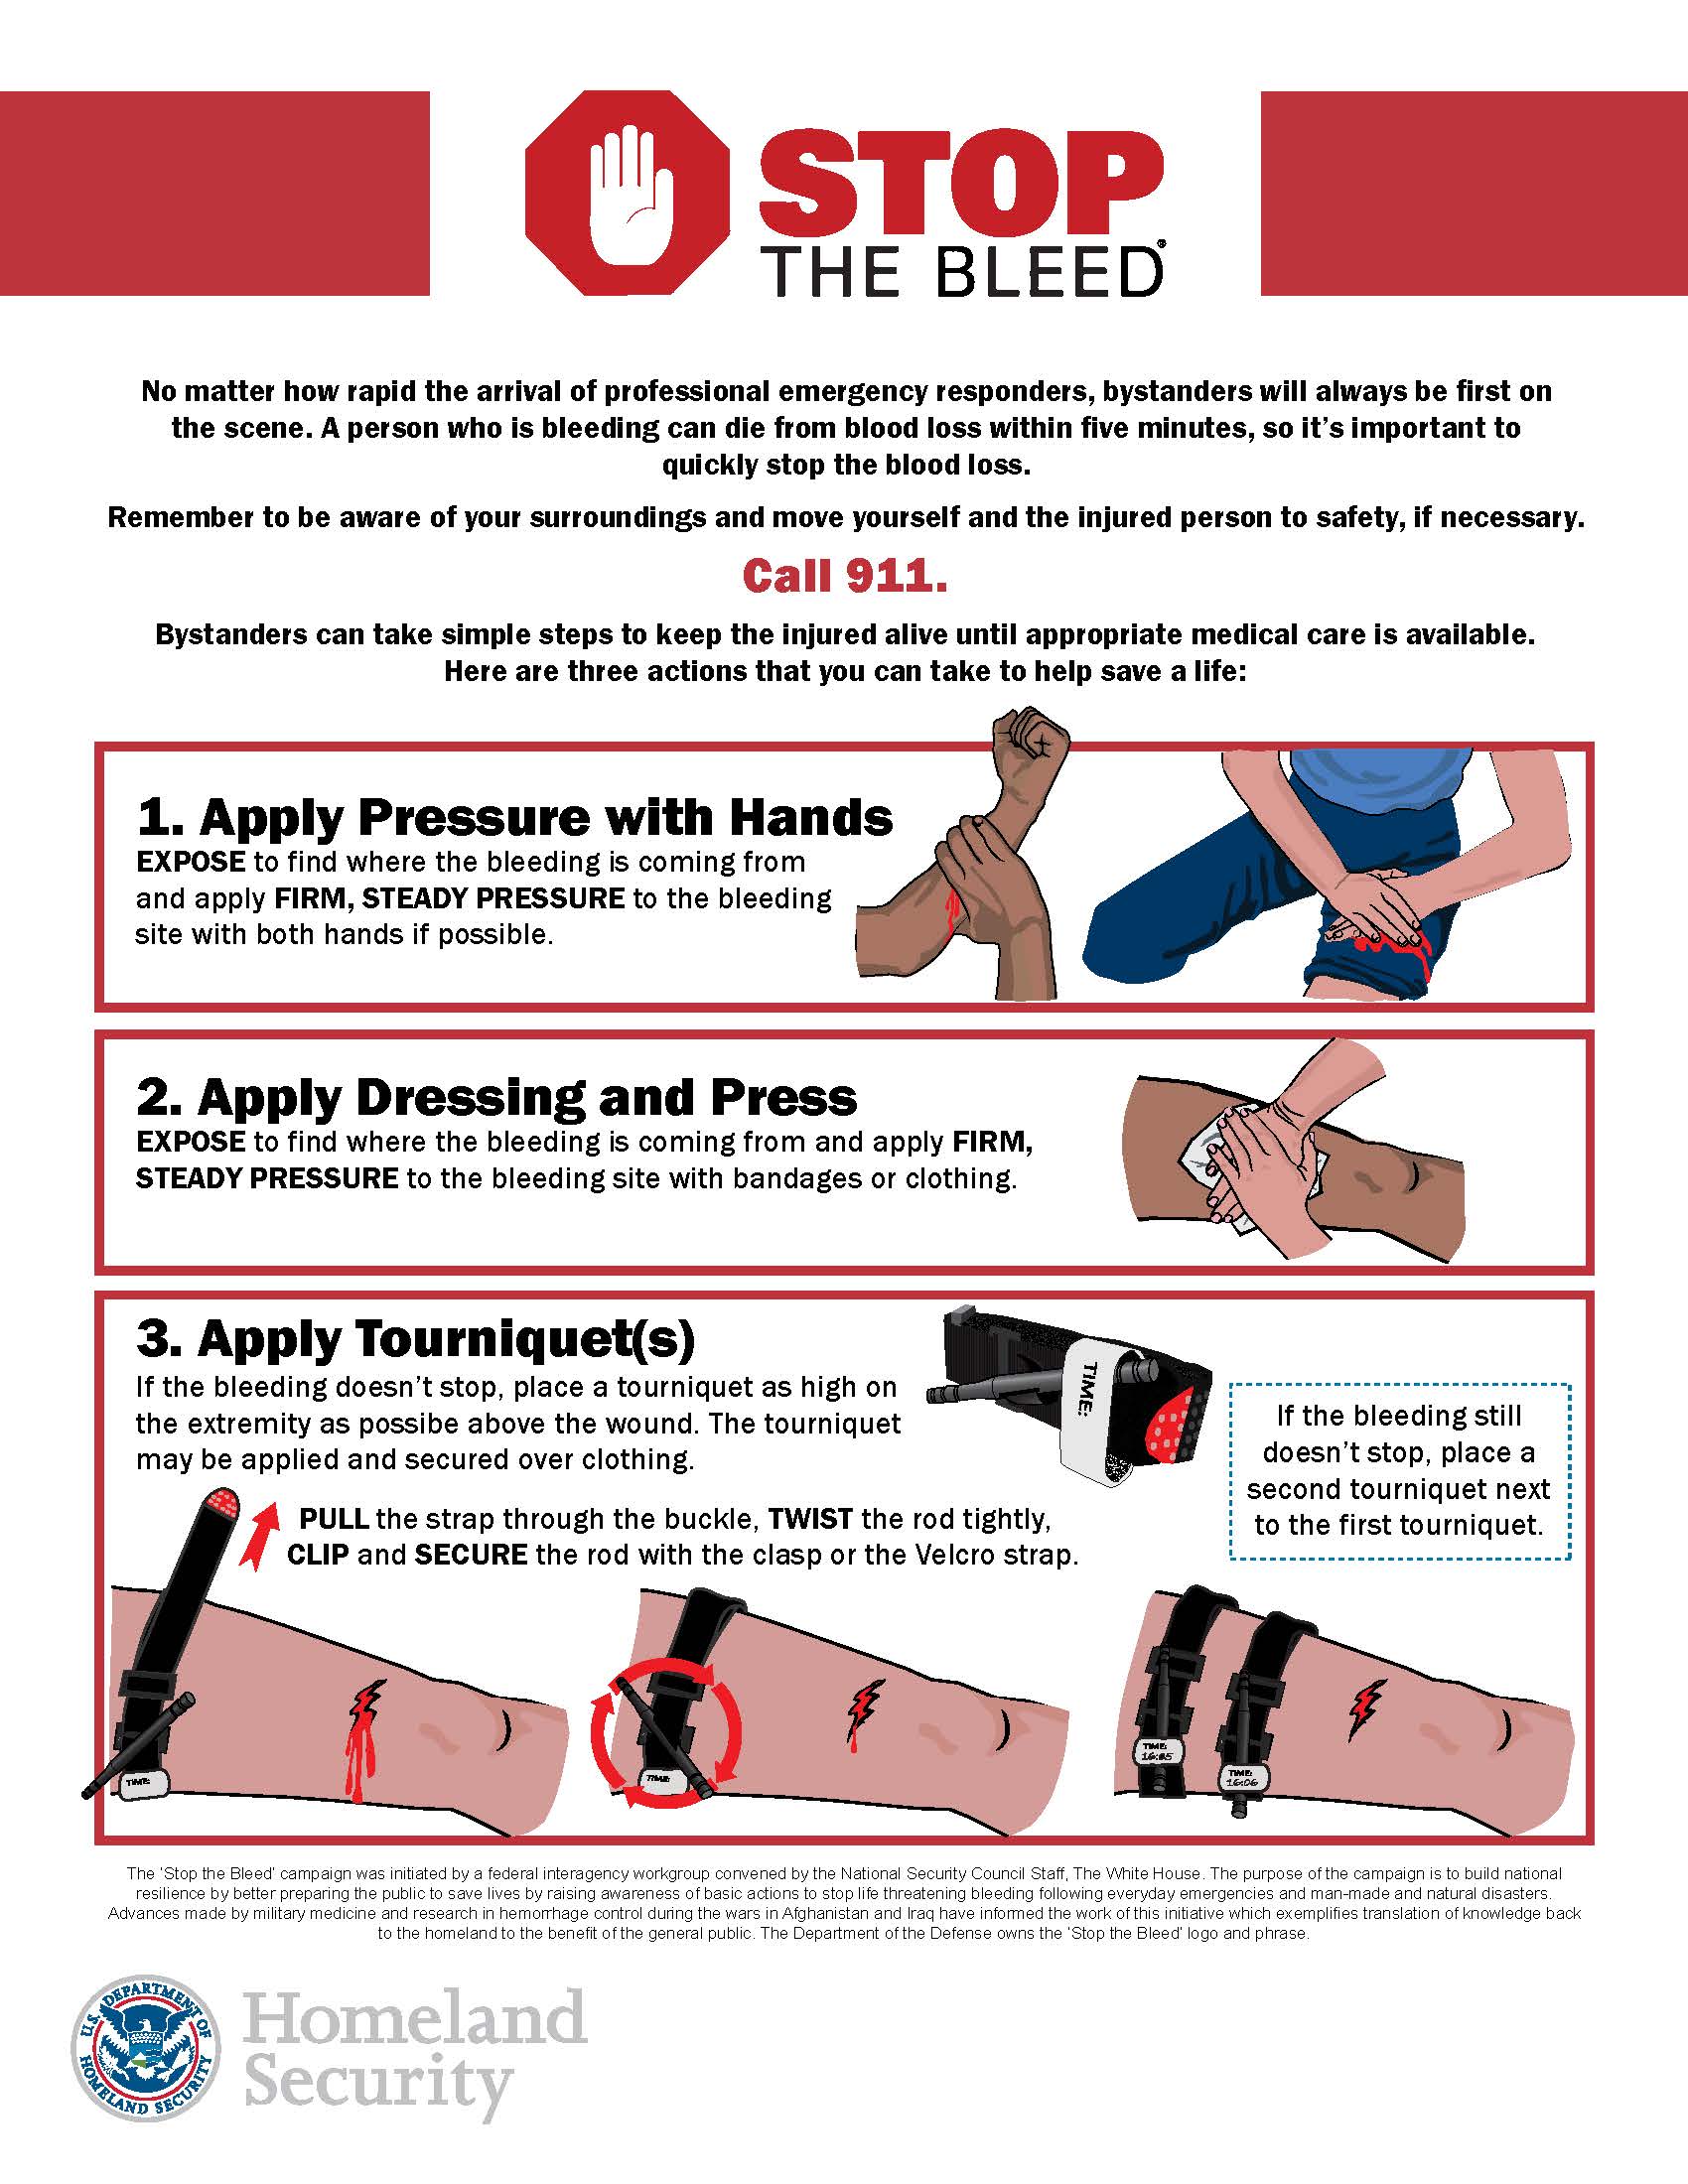
Step-by-Step: Tying a Tourniquet Properly
When it comes to tying a tourniquet, precision and speed are both very important. This isn't a casual knot; it's a life-saving action. Let's walk through the steps carefully, assuming you have either a commercial tourniquet or the right materials for an improvised one. Remember, the goal is to stop the flow of blood completely, not just slow it down, you know?
Preparing the Area
First things first, you need to get to the source of the bleeding. If clothing is covering the wound, cut or tear it away to expose the injury fully. You want to place the tourniquet on bare skin, if at all possible, about two to three inches above the wound. Don't place it directly on a joint, like an elbow or knee, as it won't work as effectively there. You're aiming for the fleshy part of the limb, higher up, more or less.
Make sure there are no objects in the way, like keys in a pocket or thick seams in clothing, that could prevent the tourniquet from applying even pressure. You want a clear path for the band to press down firmly on the limb. This initial preparation is, honestly, quite critical for the tourniquet to do its job right. It sets the stage, you know?
Placing the Tourniquet
Now, take your tourniquet, whether it's a commercial one or your improvised band, and wrap it around the limb. Make sure it's snug, but not yet tightened to the point of stopping blood flow. For a commercial tourniquet, you'll feed the strap through the buckle or clip. For an improvised one, you'll tie a simple overhand knot, leaving enough slack to insert your windlass later. It should feel pretty secure, but still allow a little movement, you know?
Position the tourniquet so that it's high on the limb but still below the armpit or groin, if the injury is in the upper arm or thigh. The idea is to be above the bleeding, between the wound and the heart. This placement is key to cutting off the blood supply effectively. It's about finding that sweet spot, you see, to ensure maximum impact on the blood vessels.
Tightening for Effect
This is where the magic happens, so to speak, when tying a tourniquet. If you have a commercial tourniquet, you'll begin to twist the windlass rod until the bleeding stops. You'll likely need to twist it quite a bit, applying significant force. For an improvised tourniquet, insert your windlass (stick, pen, etc.) into the knot you tied, or under the band, and begin to twist it. Twist it firmly and consistently. You'll know it's working when the bleeding completely stops and the pulse below the tourniquet disappears. This can be a bit painful for the person, but it's a necessary pain to save their life, you know?
Keep twisting until the bleeding stops completely. This is very important. If the bleeding only slows down, it means you haven't applied enough pressure. Don't stop until the flow is completely cut off. It might take more turns than you expect, but that's what's needed. It's about applying enough force to truly compress those blood vessels, you see.
Securing and Marking the Time
Once the bleeding has stopped, you need to secure the windlass so it doesn't unwind. Commercial tourniquets have clips or straps for this purpose. For an improvised one, you might tie the ends of the band around the windlass to hold it in place, or use another piece of tape or fabric to keep it from loosening. It needs to be stable, otherwise, the pressure will ease off and the bleeding could start again. This step is, honestly, just as important as the tightening itself, you know?
After securing it, it's absolutely vital to note the time you applied the tourniquet. Write the time directly on the tourniquet itself, on the person's forehead, or on a piece of paper taped to them. Use a permanent marker if you have one. This information is incredibly important for medical professionals who will take over care, as it helps them manage the person's treatment. This is a pretty critical detail, you see, and it should never be skipped.
Common Mistakes to Avoid When Tying a Tourniquet
Even with good intentions, people can make mistakes when tying a tourniquet. One very common error is not tightening it enough. If the bleeding doesn't stop, the tourniquet isn't working, and it might even make things worse by partially restricting blood flow without stopping it completely. Remember, it needs to be tight enough to stop all bleeding, not just some of it, you know?
Another mistake is placing it over clothing or directly on a joint. As we discussed, bare skin above the wound, not on a joint, is the way to go. Placing it over thick fabric can reduce the effectiveness of the pressure. Also, using materials that are too narrow, like string or wire, can cause severe tissue damage without effectively stopping the bleeding. These materials can cut into the skin and nerves, causing more harm than good, you see.
Finally, once a tourniquet is applied and bleeding stops, don't remove it or loosen it unless instructed by medical professionals. There's a common fear that leaving it on for too long will cause permanent damage, but in a life-threatening bleeding situation, saving the life comes first. The medical team will decide when and how to remove it safely. So, just leave it be once it's doing its job, more or less.
Important Considerations After Application
Once you've successfully applied a tourniquet and stopped the bleeding, your job isn't quite done, you know? Your next immediate step is to get professional medical help on the way, if they aren't already. Call emergency services right away. Tell them a tourniquet has been applied and provide the time it was put on. This information is very helpful for them, you see.
Keep the person warm and calm. Shock can set in even after bleeding has stopped, so covering them with a blanket or jacket can help. Stay with them, offer reassurance, and monitor their condition until help arrives. Do not give them anything to eat or drink. Their body is dealing with a serious situation, and adding food or water could cause problems later if they need surgery.
Continuously check the wound for any signs of renewed bleeding, and also check the limb below the tourniquet for a pulse. If bleeding starts again, it means the tourniquet might have loosened or wasn't tight enough to begin with. In that case, you might need to tighten it further or apply a second tourniquet just above the first one, if necessary. It's about staying vigilant, you know, and making sure the solution stays effective.
Myths and Facts About Tourniquets
There are some common ideas floating around about tourniquets that aren't quite right, and it's good to clear those up. For a long time, there was a belief that tourniquets almost always caused permanent damage or led to limb loss. The fact is, while there are risks, the risk of losing a limb from a tourniquet is far, far less than the risk of dying from uncontrolled bleeding. In a truly life-threatening situation, the benefits of stopping the bleed usually outweigh the risks, you know?
Another myth is that you should loosen a tourniquet every few minutes to let blood flow. This is absolutely false and very dangerous. Loosening a tourniquet, even for a moment, can cause the person to lose a significant amount of blood very quickly, and it can also send harmful toxins into their bloodstream. Once it's on and working, it stays on until medical professionals can take over. This is a pretty firm rule, you see, and it's there for a good reason.
A true fact is that a properly applied tourniquet will hurt. It will be painful because it's cutting off blood flow to the limb. This pain is a sign that it's working. Don't let the person's discomfort deter you from tightening it enough. The pain, in this case, is a sign of life being saved. It's a tough truth, but it's something to remember when you're in that moment, more or less.
Practice Makes Perfect: Why Training Matters
Knowing how to read about tying a tourniquet is one thing, but actually doing it in a high-stress situation is quite another. That's why practice, and getting some hands-on training, is so incredibly valuable. You can find courses through organizations like the American Red Cross or other first aid providers. These courses give you the chance to practice with real tourniquets and get feedback from experienced instructors. It's a bit like learning to drive; reading the manual helps, but actually getting behind the wheel
Detail Author:
- Name : Markus Lubowitz
- Username : fkrajcik
- Email : schuyler.hane@yahoo.com
- Birthdate : 2000-08-13
- Address : 4617 Brown Forges Daniellaton, KY 92926
- Phone : +1.262.290.6186
- Company : Goodwin, Tillman and Yundt
- Job : Survey Researcher
- Bio : Maxime velit porro aut. Voluptas ut eius necessitatibus quam voluptatem culpa itaque. Porro repellat nemo inventore perferendis inventore ut. Maiores nisi eligendi dolor asperiores quia sed.
Socials
twitter:
- url : https://twitter.com/greg7578
- username : greg7578
- bio : Vel voluptatem nesciunt odit. Aut minima natus aut adipisci aut. Et autem quia fugiat sapiente quis aut fugiat. Ut aliquam quasi iure nulla minus.
- followers : 3471
- following : 564
linkedin:
- url : https://linkedin.com/in/greg_romaguera
- username : greg_romaguera
- bio : Aut nisi tenetur provident commodi repellat.
- followers : 200
- following : 2402
instagram:
- url : https://instagram.com/greg_romaguera
- username : greg_romaguera
- bio : Ut perferendis dolorem aperiam quia sequi sed nisi ea. Voluptatem sequi molestiae non qui.
- followers : 1220
- following : 1874
facebook:
- url : https://facebook.com/romaguera1976
- username : romaguera1976
- bio : Velit hic aliquid cumque ut deleniti adipisci sunt.
- followers : 6585
- following : 2818
