
Putting tape into a packing tape dispenser might seem like a small task, but getting it right can truly make your packing jobs much, much smoother. So, if you're getting ready to move some items, or maybe just sending out a package, knowing how to properly set up your tape tool is a real time-saver. It's almost like preparing a vehicle for a big trip, you want everything just right for the journey ahead, you know?
A packing tape dispenser, in a way, is a clever little machine that holds a roll of tape, letting you pull it out and cut it easily. It's designed to make sealing boxes quick and simple, which is very helpful when you have a lot of things to pack up. This tool basically takes the fuss out of trying to tear tape with your hands or finding scissors every time you need a piece, that's for sure.
This article will walk you through the simple steps of getting your tape into the dispenser, ensuring it works as it should. We'll also cover some common things that might go wrong and how to fix them, so you can keep your packing flowing without any stops. It's pretty straightforward once you get the hang of it, and we're here to help you do just that, as a matter of fact.
Table of Contents
- Why a Tape Dispenser Makes Life Easier
- What You'll Need to Get Started
- Step-by-Step: How to Load Your Tape Dispenser
- Common Hurdles and How to Overcome Them
- Keeping Your Dispenser Ready
- Frequently Asked Questions
- Wrapping Things Up
Why a Tape Dispenser Makes Life Easier
Using a packing tape dispenser really does make a noticeable difference when you're sealing boxes, you know. It's much faster than trying to pull tape off a roll by hand and then wrestling with scissors to cut it. This tool provides a consistent way to apply tape, which helps make your boxes more secure for transport, that's for sure.
Think about how much time you save when you don't have to search for the end of the tape or deal with it sticking to itself. A dispenser keeps the tape ready to go, and the built-in cutter means you get a clean break every time. It's a simple convenience that adds up to a lot of saved effort, especially if you have many packages to prepare, or something like that.
For anyone who packs regularly, whether for a home move or for sending out products, this tool is a real helper. It takes a bit of the physical work out of the job, and it also makes the whole process feel a little less messy. You might find yourself wondering how you ever managed without one, honestly.
Understanding the "Load"
When we talk about "loading" the tape, it's pretty much like putting a quantity of something into a device, as "My text" describes. It's the act of placing the tape roll onto the dispenser so it can be used. Just like you might "load" a truck with watermelons, you "load" the dispenser with a tape roll, so it's ready to carry out its purpose, that's what it is.
The "load" here refers to the tape itself, which is the commodity being prepared for use by the dispenser. It's about getting the tape into the correct position so the dispenser can do its job of holding, pulling, and cutting. It's a measured quantity of tape, prepared for its carrier, the dispenser, in a way.
So, when you "load" the tape, you are essentially setting up the tool with its necessary supply. It's about getting the tape ready to be carried and dispensed, allowing the device to perform its function. This simple action prepares the system for the work it needs to do, and it's quite an important first step, you know.
What You'll Need to Get Started
Before you begin the process of getting your tape into the dispenser, it helps to have a couple of things ready. This just makes the whole experience smoother and quicker, so you can get right to sealing your boxes. It's a bit like getting all your ingredients out before you start cooking, it just makes sense, you know?
Having the right items on hand means you won't have to stop midway through the loading process to go find something. This saves you a little bit of time and prevents any frustration that might come from a sudden halt. It's a small step, but it really does make a difference in how easy the task feels, honestly.
So, let's look at the two main things you'll need to have ready. These are pretty standard items, but making sure they are suitable for each other is a good idea. It's about making sure the parts fit together well, that's what it is.
The Right Tape Roll
First, you'll need a roll of packing tape. These rolls typically come in standard widths, like two inches or three inches, and they have a core in the middle. The core is the round cardboard part that the tape is wrapped around, you see.
It's important to make sure your tape roll matches the size of your dispenser. Most dispensers are made for a specific width of tape. If the tape is too wide or too narrow, it won't sit correctly on the dispenser's spindle, and it won't work properly, you know.
Also, check the tape's stickiness. You want tape that will hold your boxes securely. Some tape is made for lighter items, and some is for heavier loads. Picking the right kind of tape for your needs is a good idea, as a matter of fact.
Your Packing Tape Dispenser
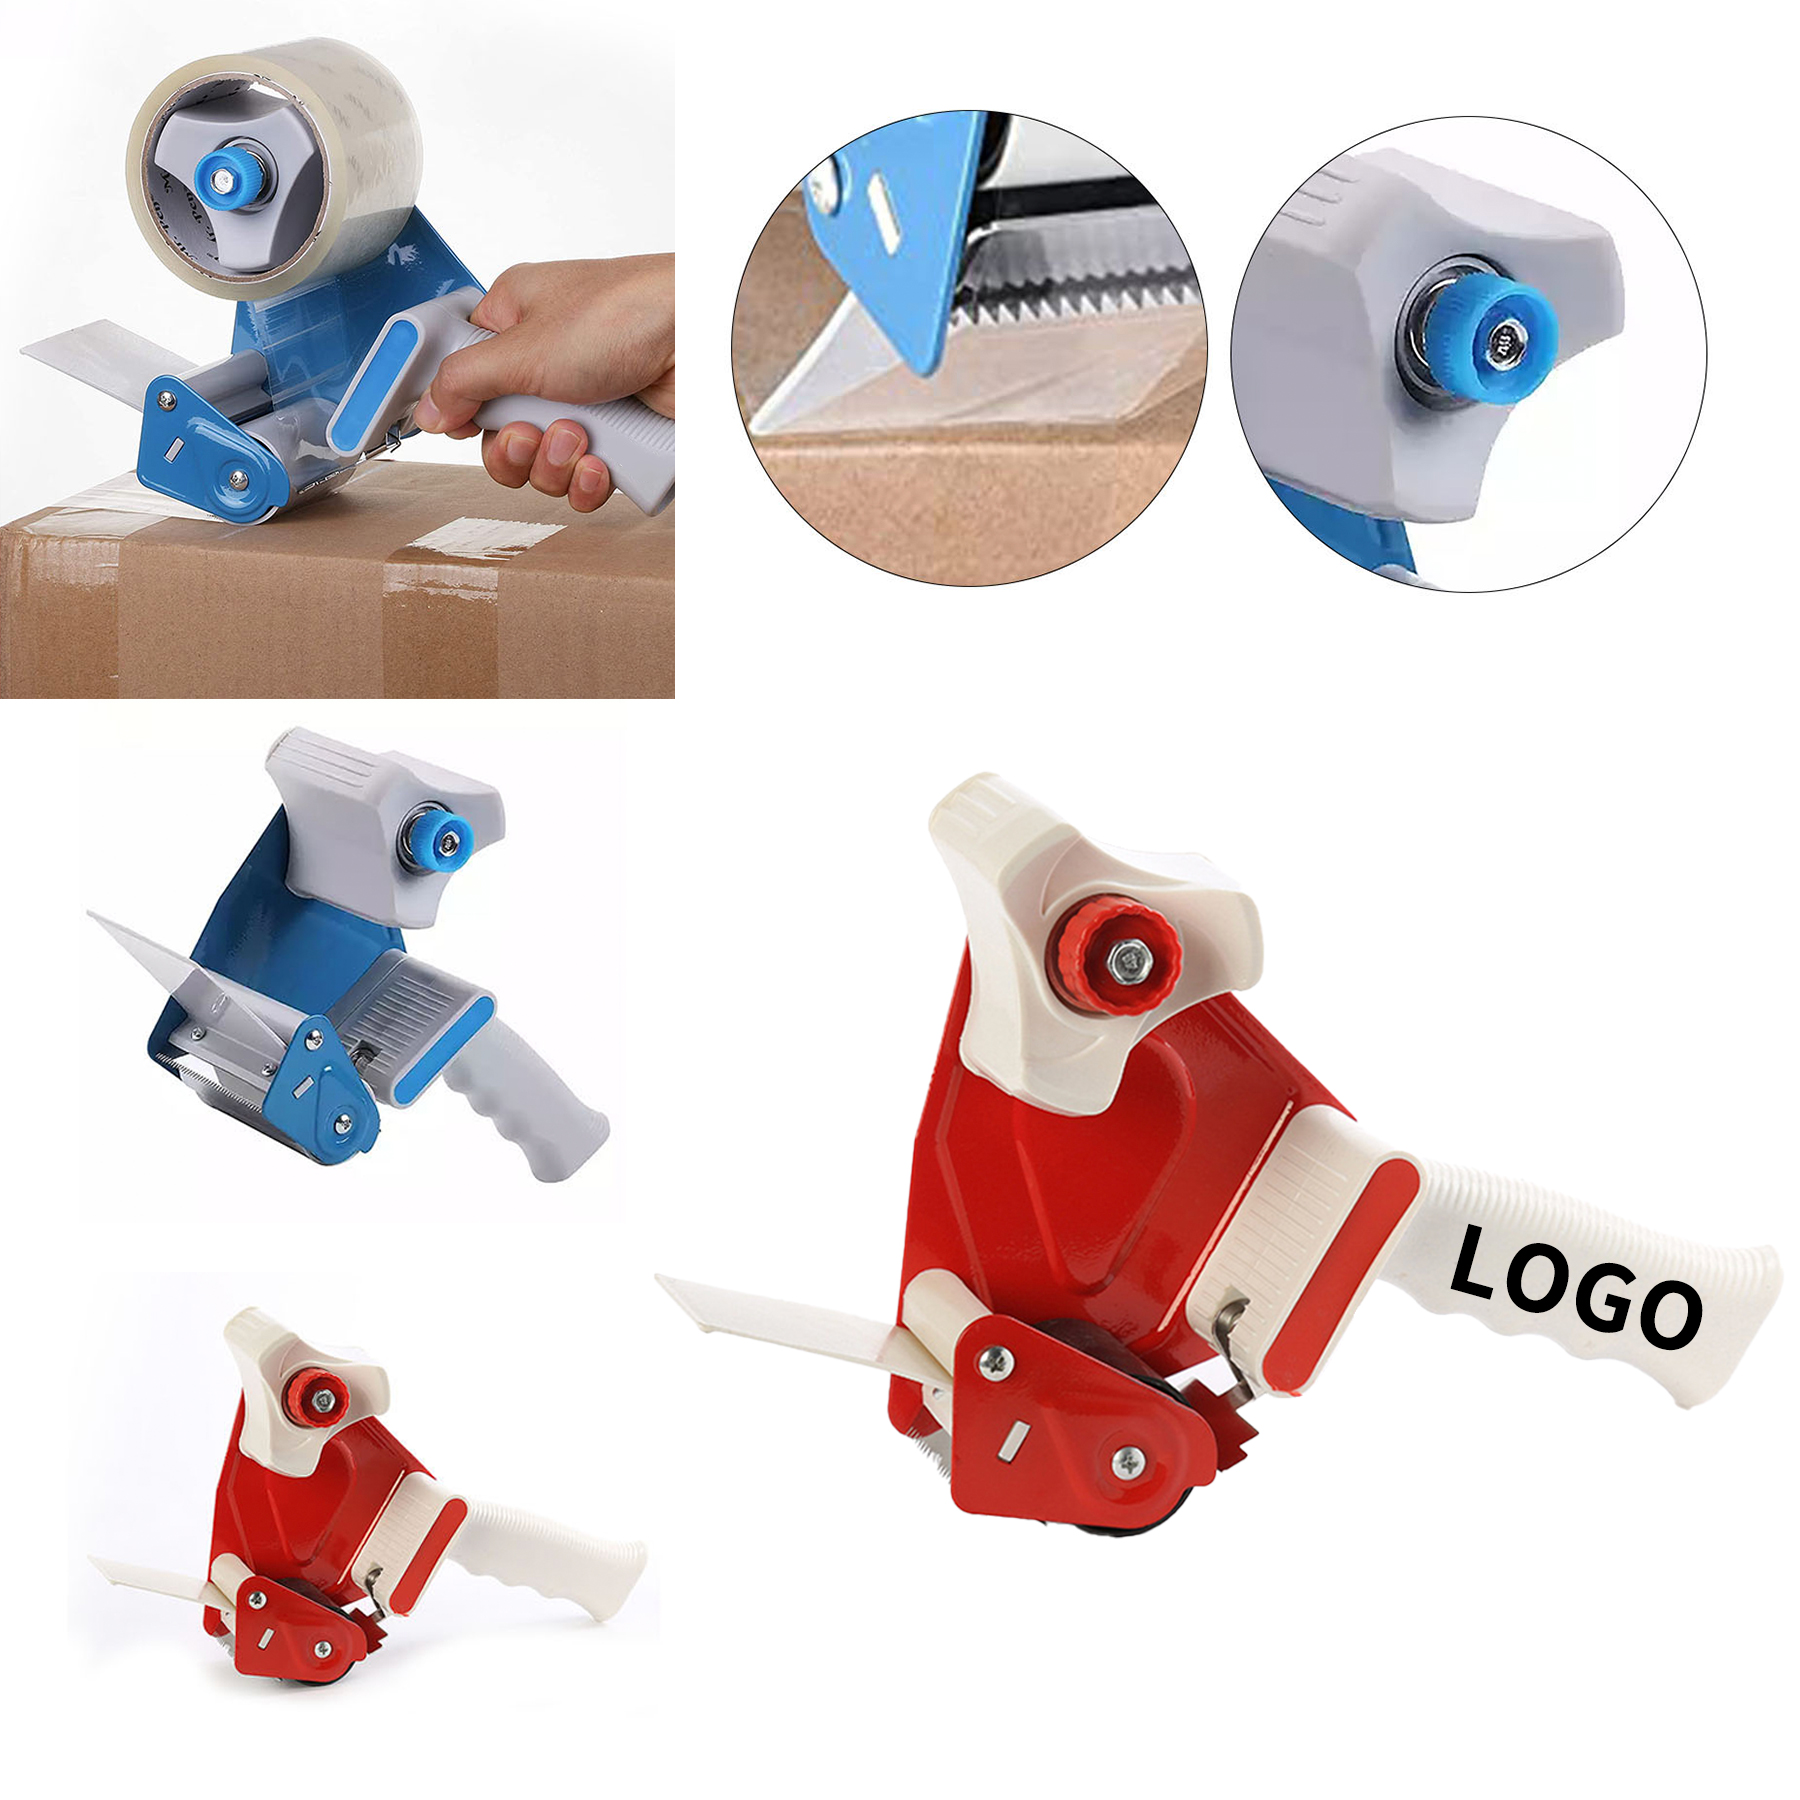
Next, you'll need your packing tape dispenser itself. These tools usually have a handle, a roller, and a sharp metal blade. The roller helps the tape unspool smoothly, and the blade cuts it, you know.
Take a quick look at your dispenser to make sure it's clean and nothing is blocking the path where the tape will go. Sometimes, old bits of tape or dust can build up, which might make loading a bit tricky. A quick wipe can help, so it's almost like giving it a little tune-up before you start.
Make sure the handle feels comfortable in your hand, too. You'll be holding this tool while you work, so a good grip helps. It's a simple check, but it can make a difference in your comfort, that's for sure.
Step-by-Step: How to Load Your Tape Dispenser
Now, let's get to the main part: putting that tape roll into your dispenser. This process is usually quite straightforward, but following these steps will help ensure you do it correctly the first time. It's pretty much a series of simple actions that lead to a working tool, you know.
We'll go through each part of the process, from getting the tape ready to making sure it's properly secured and ready for use. Taking your time with each step can prevent little issues later on, so it's definitely worth paying attention to the details, in a way.
By the end of these steps, your dispenser should be all set and ready to seal up your boxes. It's a satisfying feeling when it all comes together and works just right, that's for sure.
Step 1: Get Ready
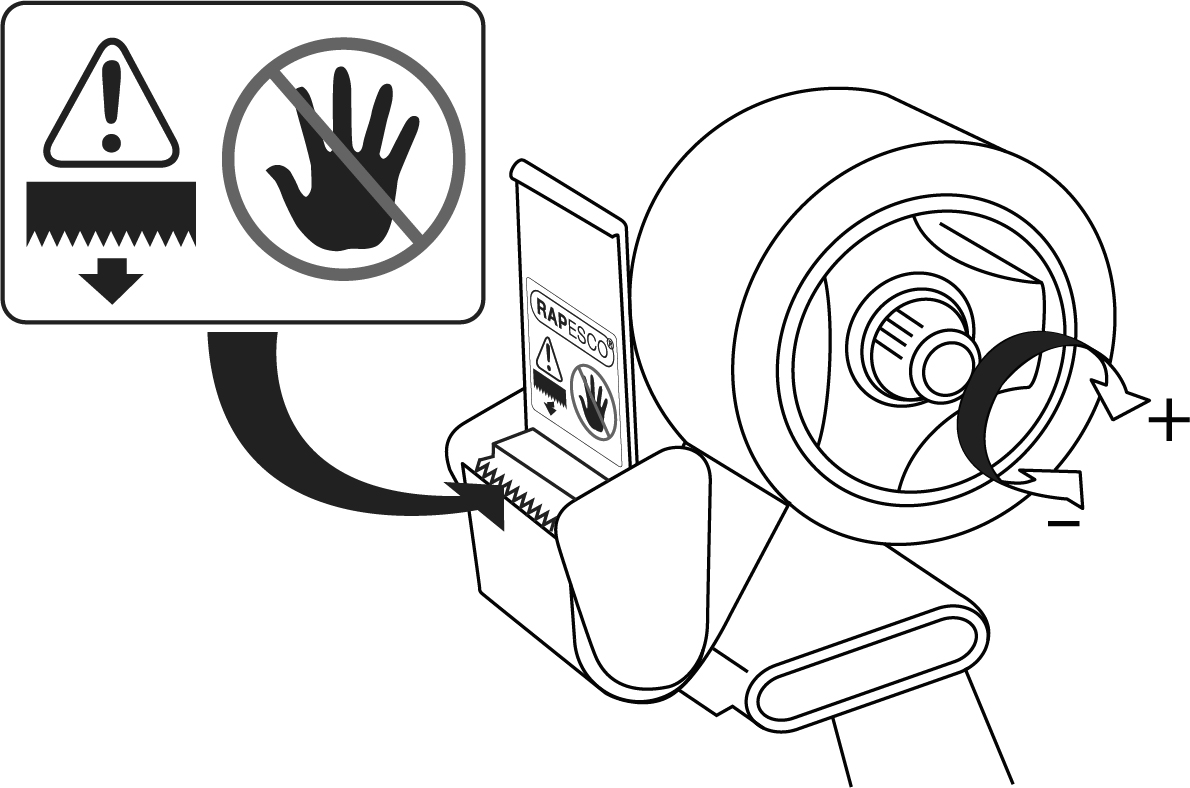
Hold your packing tape dispenser in one hand, typically by the handle. You'll want to hold it in a way that feels steady and gives you good control. This usually means having the sharp metal blade facing away from you, for safety, you know.
With your other hand, pick up your roll of packing tape. Find the loose end of the tape. Sometimes, this end can be a bit tricky to find, especially if it's stuck down flat against the roll. You might need to gently pick at it with a fingernail or a small, flat object, that's for sure.
Once you find the end, pull off a short piece, maybe about six inches or so. This gives you enough tape to work with for the next steps. It's a bit like having a lead line, making it easier to guide the rest of the tape, in a way.
Step 2: Find the Spool
Look at your tape dispenser. You should see a round part, often called a spool or a core holder, where the tape roll will sit. This part is designed to fit snugly inside the cardboard core of your tape roll, you see.
This spool might have a little spring-loaded mechanism or just be a simple plastic wheel. The important thing is that it's the place where the tape roll will spin freely as you use the dispenser. It's the central point for the tape's movement, basically.
Some dispensers might have a small lever or button that releases the spool, while others are fixed. Just make sure you know how your particular dispenser works so you can easily place the tape roll onto it, you know.
Step 3: Place the Tape Roll
Now, take your tape roll and slide it onto the spool of the dispenser. The tape should unroll from the bottom of the roll, with the sticky side facing down as it comes off the roll. This is a very common point where people sometimes get it wrong, you know.
Imagine the tape coming off the bottom of the roll and going *under* the main roller of the dispenser. If you load it the other way, with the tape coming off the top, it won't work correctly, or it will be very awkward to use. It's a bit like putting a shirt on backward, it just doesn't feel right, does it?
Make sure the tape roll sits firmly on the spool. It should spin freely without wobbling too much. A good fit helps the tape come off smoothly when you pull it, as a matter of fact.
Step 4: Guide the Tape
Once the tape roll is on the spool, take that short piece of tape you pulled off earlier. You need to guide this piece between the main roller of the dispenser and the metal blade. The sticky side of the tape should be facing down, ready to stick to a surface, you see.
The roller is there to press the tape down onto the box, and the blade is there to cut it cleanly. So, the tape needs to pass *over* the roller and then *under* the blade. This setup ensures that when you pull the dispenser across a box, the tape lays down flat and then gets cut when you tilt the dispenser, you know.
Sometimes, there might be a small gap or a specific slot for the tape to go through. Just gently push the tape through this path until a few inches of it are hanging free past the blade. It's a bit like threading a needle, you need to get it through the right opening, that's for sure.
Step 5: Secure the Tape
With the tape guided through the roller and past the blade, you're almost done. To secure it, you can lightly press the exposed sticky end of the tape onto the edge of the dispenser's frame, or even onto the side of the blade guard if it has one. This just holds it in place until you're ready to use it, you know.
This little bit of tape acts as a starting point for your next use. It prevents the tape from falling back into the dispenser or sticking to itself. It's a simple way to keep things tidy and ready for action, basically.
Make sure the tape isn't twisted or folded. It should be flat and ready to unroll smoothly. A flat piece of tape means less fuss when you start sealing your first box, that's for sure.
Step 6: Test It Out
Before you start packing all your items, it's a good idea to do a quick test. Grab a spare piece of cardboard or an old box. Hold the dispenser with the tape end touching the box, sticky side down, you know.
Press the roller down onto the box and pull the dispenser across the surface, letting the tape unroll. Once you've pulled out enough tape, tilt the dispenser downward sharply to engage the blade and cut the tape. The tape should cut cleanly and easily, as a matter of fact.
If the tape comes out smoothly and cuts without a problem, then you've loaded it correctly! If it sticks, twists, or doesn't cut well, you might need to adjust something. It's a bit like a dress rehearsal before the big show, making sure everything works as it should, you know.
Common Hurdles and How to Overcome Them
Even with clear instructions, sometimes things don't go exactly as planned when you're trying to load tape. It's pretty normal to run into a little snag here and there. But don't worry, most of these issues are easy to fix once you know what to look for, you know.
We'll go over a few common problems that people sometimes face when getting their tape dispenser ready. Knowing these potential hiccups ahead of time can save you some frustration and help you get back to your packing faster. It's a bit like having a troubleshooting guide ready, that's for sure.
By understanding these simple fixes, you'll be able to handle almost any tape loading challenge that comes your way. It's really about making small adjustments to get the tool working perfectly, as a matter of fact.
Tape Not Sticking Right
If you've loaded the tape and it's not sticking to the box when you try to use it, the most common reason is that the tape is loaded backward. Remember, the sticky side needs to be facing down as it comes off the roll and goes over the roller, you know.
Take the tape roll off the dispenser and flip it around. Re-thread the tape so that it unrolls from the bottom of the roll, with the sticky side ready to meet the box. This is a very frequent mix-up, and usually, it's the first thing to check, that's for sure.
Another reason could be that the tape itself isn't very sticky, perhaps it's old or a lower quality. If flipping the tape doesn't help, you might need a fresh roll of tape. Sometimes, tape just loses its stickiness over time, in a way.
Tape Twisting
When you pull the tape, does it twist or wrinkle instead of coming out flat? This often happens if the tape isn't sitting quite right on the dispenser's spool, or if it's not guided smoothly through the roller and blade area, you know.
First, check the tape roll on the spool. Make sure it's pushed all the way on and isn't wobbling. If there's a spring-loaded part on your dispenser, ensure the tape is firmly against it, so it holds the roll steady. It's a bit like making sure a wheel is properly seated on an axle, you know.
Then, check the path of the tape. Make sure it's not catching on any part of the dispenser's frame or getting pinched. Sometimes, just gently adjusting the tape's position as it comes off the roll can fix this. A smooth path means a smooth pull, basically.
Blade Issues
If the tape isn't cutting cleanly, or if it's tearing unevenly, the problem might be with the blade itself or how the tape is positioned near it. A dull blade can make cutting difficult, but often it's just about how you use it, you know.
First, make sure the tape is passing directly under the blade, not off to one side. The blade is designed to cut across the tape's full width. If the tape isn't aligned, it might just tear instead of cutting cleanly, that's for sure.
When you cut, remember to tilt the dispenser sharply downward. This action brings the blade firmly against the tape. If the blade seems truly dull, some dispensers allow for blade replacement, but many do not. For most home users, a new dispenser might be the answer if the blade is worn out, in a way.
Keeping Your Dispenser Ready
Once you've got your tape loaded and working well, a few simple habits can help keep your dispenser in good shape for future use. It's pretty much about a little bit of care to make sure your tool is always ready when you need it, you know.
After you finish a packing job, it's a good idea to make sure the end of the tape is secured onto the dispenser's frame or blade guard. This prevents the tape from falling back onto the roll or sticking to things it shouldn't. It's a small step that saves you from searching for the tape end next time, as a matter of fact.
Also, try to keep your dispenser in a clean, dry place. Dust and dirt can sometimes build up on the roller or around the blade, which might affect how smoothly the tape comes out. A quick wipe down every now and then can help keep things running smoothly, you know.
If you're using your dispenser very often, you might notice the blade getting a little less sharp over time. For most people, this isn't a frequent issue, but it's something to keep in mind. A well-cared-for dispenser will serve you better and longer, that's for sure.
Frequently Asked Questions
Why does my packing tape keep twisting when I try to use it?
Tape twisting is a common issue, and it's often because the tape roll isn't sitting quite right on the dispenser's spool. Make sure the roll is pushed all the way onto the spool and that it's not wobbling. Also, check the path of the tape to ensure it's not catching on any part of the dispenser's body as it unrolls, you know. Sometimes, the tape might also be slightly misaligned as it passes over the roller and under the blade, so adjusting its position can help it lay flat, that's for sure.
Can I use any size tape roll in my packing tape dispenser?
No, not just any size tape roll will work, as a matter of fact. Packing tape dispensers are typically designed for specific tape widths, most commonly 2-inch or 3-inch rolls. The spool and the frame of the dispenser are made to fit a particular width, so if your tape roll is too wide or too narrow, it won't sit properly or unroll smoothly. Always check the specifications of your dispenser to ensure you're using the correct tape size for it, you know.
My tape dispenser's blade seems dull; can I sharpen it or replace it?
Most standard packing tape dispensers have fixed blades that are not really meant for sharpening or easy replacement. The blades are often serrated metal strips, and trying to sharpen them can be quite difficult and even a bit unsafe. While some heavy-duty or professional models might allow for blade changes, for typical home-use dispensers, if the blade becomes too dull to cut effectively, it's usually time to consider getting a new dispenser. It's pretty much a wear-and-tear item, you know.
Wrapping Things Up
Getting your packing tape dispenser loaded correctly is a simple skill that really does make a big difference in your packing work. It turns a potentially messy task into something quick and efficient. By understanding how the tape "loads" into the tool, and following the steps we've talked about, you're well on your way to smooth, easy packing, you know.
Remember, a little practice can make you quite quick at this. And knowing how to troubleshoot those common little issues means you won't get stuck in the middle of a big packing job. It's pretty satisfying when your tools work just as they should, that's for sure.
So, the next time you need to seal a box, you'll be ready to go. You can find more helpful information about packing and moving on our site. Learn more about packing strategies on our site, and link to this page how to use a tape gun for more details, honestly.

Detail Author:
- Name : Mylene Schumm
- Username : ludie72
- Email : monroe.batz@jacobi.org
- Birthdate : 1976-02-29
- Address : 440 Barrows Port West Dagmarhaven, NH 40648
- Phone : 1-907-588-9368
- Company : O'Reilly, Kunde and Pagac
- Job : Poultry Cutter
- Bio : Assumenda quia id debitis aut ea in. Ut assumenda sint quia eos ipsam eius. Et reprehenderit voluptas aut et et nesciunt. Enim saepe minima recusandae vel quis et.
Socials
tiktok:
- url : https://tiktok.com/@cwiza
- username : cwiza
- bio : Ex voluptas enim magnam velit vel optio quia.
- followers : 5319
- following : 1811
facebook:
- url : https://facebook.com/cwiza
- username : cwiza
- bio : Sed quia ea animi neque.
- followers : 338
- following : 2901
linkedin:
- url : https://linkedin.com/in/charlie_wiza
- username : charlie_wiza
- bio : Rem est aut a pariatur quibusdam dolorem autem.
- followers : 4413
- following : 1572
