
Do you ever feel like your nails need a little extra something, a touch of sparkle that really catches the light? Maybe you're looking for a fresh, new way to express your style, something a bit more playful than a plain color. Well, you know, glitter ombre nails are having quite a moment, and it's easy to see why. They offer a lovely blend of sophistication and fun, making your fingertips look absolutely captivating. It's that pretty fade from one color to a shimmering glitter that just works so well, truly.
This nail style, actually, brings together two wonderful looks: the smooth color transition of ombre and the dazzling effect of glitter. It's a rather popular choice for all sorts of events, from everyday wear to special gatherings. People seem to love how it adds a bit of pizzazz without being too overwhelming, you know? It's a nice way to show off your personality, too.
So, if you're curious about giving your nails a truly special look, or perhaps you're just hunting for some fresh ideas for your next manicure, you've come to the right spot. We're going to explore what makes glitter ombre nails so appealing and how you can get this fantastic style yourself, even if you're fairly new to nail art. It's pretty straightforward, honestly, and the results are often quite stunning.
Table of Contents
- What Are Glitter Ombre Nails?
- Why Everyone Loves This Sparkling Style
- Getting Ready: Your Glitter Ombre Toolkit
- Step-by-Step: How to Create Your Own Glitter Ombre Nails
- Color Combos and Design Ideas for Glitter Ombre
- Making Your Glitter Ombre Last Longer
- Common Questions About Glitter Ombre Nails
- Troubleshooting Your Glitter Ombre Look
- Taking Off Your Glitter Ombre Nails the Right Way
- Your Next Sparkling Adventure
What Are Glitter Ombre Nails?
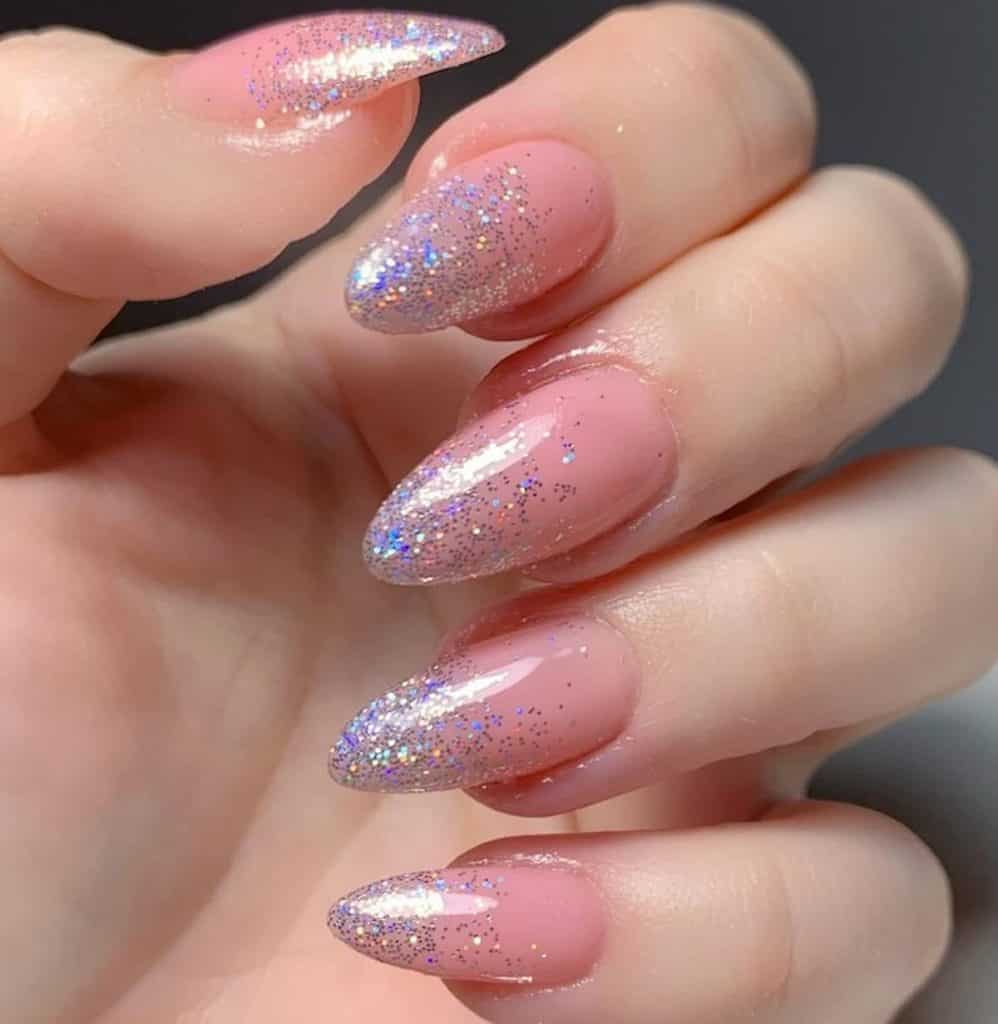
Glitter ombre nails, you know, involve a cool transition. It's where a base nail color, or even a clear coat, slowly fades into a concentration of glitter. Typically, the glitter is heaviest at the tip of the nail and then, like, gradually disperses downwards towards the cuticle, creating a soft, almost misty effect. This style can also be done in reverse, with glitter at the cuticle and fading towards the tip, which is pretty neat.
The beauty of this look, honestly, comes from the way the light catches the glitter. It gives your nails a dynamic quality, appearing different from various angles. It's a very versatile style, too, that can be adapted for any occasion or mood you might be feeling.
Why Everyone Loves This Sparkling Style
There are quite a few reasons why glitter ombre nails have become a firm favorite for many people. First off, they're incredibly eye-catching without being too over the top, which is a big plus. They add a touch of glamour that feels special, but also very wearable, honestly.
Then there's the versatility aspect. You can pick any base color you like, from a soft nude to a deep, dramatic shade. Then, you can pair it with all sorts of glitter colors and sizes, making each manicure truly unique. This means you can match your nails to your outfit, your mood, or even the season, which is pretty cool.
Also, they're surprisingly forgiving if you're just starting out with nail art. The ombre effect helps to blend any small imperfections, and the glitter itself is quite good at hiding little mistakes. So, you know, it's a great style to try if you're building up your nail art skills. It's just a fun, expressive way to decorate your hands, really.
Getting Ready: Your Glitter Ombre Toolkit
Before you start creating your dazzling glitter ombre nails, it's a good idea to gather all your supplies. Having everything ready to go will make the process much smoother, honestly. You don't want to be hunting for things mid-manicure, that's for sure.
Essential Polishes and Glitter
You'll need a few key items for the actual design. First, pick a good base coat. This helps protect your natural nails and gives your polish something to stick to, which is pretty important. Then, you'll want a nail polish for your base color, like your primary shade. This could be a nude, a pastel, or even a dark color, depending on the look you're going for.
Next, you'll need your glitter. You can use loose glitter, which is very sparkly, or a glitter polish, which is a bit easier to work with, arguably. If you're using loose glitter, you might want a clear top coat or a glitter adhesive to help it stick. For the finish, a good quality top coat is absolutely essential to seal everything in and give that lovely shine. This will also help your manicure last longer, too, which is always nice.
Application Tools
For applying the glitter, a small makeup sponge, like a wedge sponge, works really well. You can also use a fan brush or a small, flat nail art brush if you prefer, or even just your finger in some cases. Some people even use a small, soft brush to dust off excess glitter, which is a good idea. You'll also want some cotton swabs and nail polish remover for any clean-up you might need to do around your cuticles.
Clean-Up and Finish
A good quality non-acetone nail polish remover is always handy for little mistakes. You'll also want some cuticle oil to nourish your nails and skin once you're all done. This helps keep your hands looking neat and healthy, which is part of the overall beautiful nail experience. So, you know, don't skip this step, it really makes a difference.
Step-by-Step: How to Create Your Own Glitter Ombre Nails
Creating glitter ombre nails at home is actually simpler than it might seem. Just follow these steps, and you'll have beautiful, sparkling nails in no time. It's a process that builds up, so each step is quite important, really.
Prepping Your Nails
First things first, make sure your nails are clean and dry. Gently push back your cuticles and shape your nails to your liking. A clean, smooth surface helps your polish stick better and look more polished, you know? Then, apply a thin layer of your chosen base coat. Let it dry completely. This step is pretty important for protecting your nails and making your manicure last.
The Base Color
Now, apply one or two thin coats of your base nail polish color. Make sure each coat dries fully before applying the next one. This prevents bubbling and helps the color look even. If you're going for a very subtle ombre, you could even skip a colored base and just use a clear polish, which is an option, too.
Adding the Glitter Magic
This is where the sparkle comes in! If you're using loose glitter, pour a little onto a piece of paper. Apply a thin layer of clear top coat to the tip of one nail. While it's still wet, pick up some glitter with your makeup sponge or a fan brush. Gently dab the glitter onto the wet top coat, concentrating it heavily at the very tip. Then, lightly dab less glitter as you move down the nail towards the middle, creating that faded effect. You want less and less glitter as you get closer to the cuticle, which is the whole point of the ombre. Repeat this for each nail, and then, you know, let it dry for a bit.
If you're using glitter polish, it's even easier. Apply a thicker layer of glitter polish to the tip of your nail. Then, using the brush, lightly drag some of the glitter down towards the middle of the nail, thinning it out as you go. You can also use a sponge to dab the glitter polish on for a more concentrated effect at the tip, then lightly dab downwards for the fade. This method is often a bit quicker, honestly.
The Finishing Touches
Once your glitter is dry, apply a generous layer of clear top coat over all your nails. This seals in the glitter, makes your manicure smooth, and adds a lovely shine. You might even want to apply two coats of top coat, especially if you used loose glitter, to make sure it's really smooth and durable. This also helps to prevent the glitter from flaking off, which is a common concern. Clean up any glitter or polish around your cuticles with a cotton swab dipped in nail polish remover, which is always a good idea for a neat finish. Finally, apply some cuticle oil to moisturize your skin around the nails, too. This really completes the look, in a way.
Color Combos and Design Ideas for Glitter Ombre
The fun part about glitter ombre nails is how many different looks you can create. There are so many combinations of base colors and glitter shades to explore, you know? It really lets your creativity shine, apparently.
Classic and Elegant
For a timeless and sophisticated look, try a nude or soft pink base with gold or silver glitter tips. This combination is perfect for weddings, formal events, or just when you want a subtle sparkle for everyday wear. It's a very chic choice, honestly.
Bold and Bright
If you're feeling a bit more adventurous, pair a vibrant base color like electric blue or hot pink with iridescent or holographic glitter. This creates a really playful and eye-catching effect that's perfect for parties or summer fun. It's definitely a statement, that's for sure.
Seasonal Sparkle
Match your glitter ombre to the season! For fall, consider deep reds or forest greens with bronze or copper glitter. For winter, icy blues or purples with silver or white glitter look stunning, too. Spring could be pastels with a fine, shimmery glitter, and summer might be bright neons with multi-colored glitter. It's a fun way to keep your nails feeling fresh and relevant, you know?
Subtle Shimmer
For a softer touch, use a clear or very sheer base coat and apply a fine, barely-there glitter at the tips. This gives just a hint of sparkle, perfect for those who prefer a more understated look but still want a little something extra. It's a very delicate way to wear glitter, which is pretty nice.
Making Your Glitter Ombre Last Longer
You've put in the effort to create beautiful glitter ombre nails, so you want them to last, right? There are a few simple things you can do to extend the life of your manicure. These tips, you know, can really make a difference.
First, always use a good quality base coat and top coat. These are your manicure's best friends, honestly. The base coat helps the polish adhere better, and the top coat seals everything in, protecting it from chips and wear. Reapplying a thin layer of top coat every two to three days can also help refresh your manicure and add extra protection, which is a pretty good habit to get into.
Also, try to be gentle with your hands. Wear gloves when doing dishes or cleaning, as harsh chemicals and excessive water can really shorten your manicure's lifespan. Avoid using your nails as tools, like opening cans or scraping things, which is a common mistake. Moisturizing your cuticles regularly with cuticle oil also keeps your nails flexible and less prone to breaking, too, which is helpful.
Common Questions About Glitter Ombre Nails
People often have questions when trying out new nail styles, and glitter ombre nails are no exception. Here are some answers to common queries you might have, you know, to help you out.
How do you do glitter ombre nails?
To do glitter ombre nails, you typically apply a base color first. Once that's dry, you use a makeup sponge or a brush to dab glitter onto the tip of your nail, making it heaviest there. Then, you lightly dab less glitter as you move down towards the middle of the nail, creating a fade. A top coat seals it all in, which is pretty much the process.
What kind of glitter do you use for ombre nails?
You can use either loose cosmetic glitter or a glitter nail polish. Loose glitter often gives a more intense sparkle, but it can be a bit messier to work with. Glitter polish is easier for beginners, offering a more controlled application. Both work well, so it's a matter of preference, really.
How long do glitter ombre nails last?
The lifespan of your glitter ombre nails depends on several factors, like the quality of your polishes, how well you prep your nails, and how gentle you are with your hands. With good care, they can last anywhere from one to two weeks. Using a good base and top coat, and reapplying top coat every few days, can help them last longer, too, which is nice.
Troubleshooting Your Glitter Ombre Look
Sometimes, things don't go exactly as planned, but don't worry! Here are a few common issues you might run into with glitter ombre nails and how to fix them. It's pretty common to have a little hiccup, honestly.
If your glitter looks too chunky or uneven, you might be applying too much at once. Try using less glitter on your sponge or brush and building up the layers gradually. Multiple thin layers are usually better than one thick one for a smoother look. Also, make sure your base color is completely dry before you start adding glitter, which is quite important.
If the glitter isn't sticking well, your clear top coat layer might be drying too quickly. Work on one nail at a time, applying the clear coat and then the glitter immediately. You could also try a slightly thicker clear coat to give you more working time, you know? Sometimes, the type of glitter also makes a difference in how well it adheres.
If your ombre line looks too harsh, try dabbing the glitter more lightly as you move down the nail. You want a very gentle touch to create that soft, diffused effect. You can also use a clean, dry brush to gently blend the glitter after you've applied it, before the top coat, which can help smooth out the transition, too.
Taking Off Your Glitter Ombre Nails the Right Way
Glitter polish can be a bit stubborn to remove, but with the right method, it's not too bad. You know, trying to just scrub it off can be pretty damaging to your nails, so avoid that.
The best way to remove glitter ombre nails is with the foil method. Soak a cotton pad in nail polish remover, preferably one with acetone for glitter. Place the soaked pad on your nail, then wrap your finger tightly with a small piece of aluminum foil. Do this for all your nails, and then let them sit for about 5-10 minutes. The foil helps the remover penetrate the glitter and loosen it up, which is pretty effective.
After the waiting time, gently twist the foil and cotton pad off your nail. Most of the glitter should come right off with it. If there are any stubborn bits, you can gently push them off with an orange wood stick. Avoid scraping or forcing the glitter, as this can harm your nail plate. Finish by washing your hands and applying cuticle oil to rehydrate your nails and skin, too. It's a simple process, honestly, but it saves your nails a lot of trouble.
Your Next Sparkling Adventure
Glitter ombre nails are a fantastic way to add a bit of sparkle and personality to your look. Whether you're a seasoned nail art enthusiast or just starting out, this style is quite accessible and very rewarding. It's a truly popular choice for a good reason, offering a blend of elegance and fun that's hard to beat, you know? So, why not give it a try?
You can experiment with different color combinations, glitter types, and even placement to find your perfect sparkling style. There's a lot of room for creativity here, which is pretty exciting. Remember, practice makes perfect, and every attempt helps you get better at it, honestly.
So, gather your polishes, pick your favorite glitter, and get ready to create some truly dazzling nails. Your fingertips are about to become a sparkling masterpiece, and it's a look that will surely catch compliments. Learn more about glitter ombre nails on our site, and check out more nail art ideas on this page .


Detail Author:
- Name : Mylene Schumm
- Username : ludie72
- Email : monroe.batz@jacobi.org
- Birthdate : 1976-02-29
- Address : 440 Barrows Port West Dagmarhaven, NH 40648
- Phone : 1-907-588-9368
- Company : O'Reilly, Kunde and Pagac
- Job : Poultry Cutter
- Bio : Assumenda quia id debitis aut ea in. Ut assumenda sint quia eos ipsam eius. Et reprehenderit voluptas aut et et nesciunt. Enim saepe minima recusandae vel quis et.
Socials
tiktok:
- url : https://tiktok.com/@cwiza
- username : cwiza
- bio : Ex voluptas enim magnam velit vel optio quia.
- followers : 5319
- following : 1811
facebook:
- url : https://facebook.com/cwiza
- username : cwiza
- bio : Sed quia ea animi neque.
- followers : 338
- following : 2901
linkedin:
- url : https://linkedin.com/in/charlie_wiza
- username : charlie_wiza
- bio : Rem est aut a pariatur quibusdam dolorem autem.
- followers : 4413
- following : 1572
