
Have you ever felt a little spark, a creative itch, wanting to capture the essence of a camera on paper? It's a really common feeling, you know, and a lot of people find themselves curious about how to draw a camera. Maybe you're someone who loves photography and wants to bring that passion to your sketchbook, or perhaps you just appreciate the classic look of an old-style camera. Either way, there's a certain charm in putting pencil to paper and creating something visual, isn't there?
Drawing a camera, especially an older model, can be pretty fun, but it's not always super easy. That's especially true because not everyone happens to have a camera just lying around their home to use as a good reference. You might feel a bit stuck, wondering where to even begin with all those interesting shapes and little bits. Well, this guide is here to help fix that, offering you some really easy camera drawing ideas.
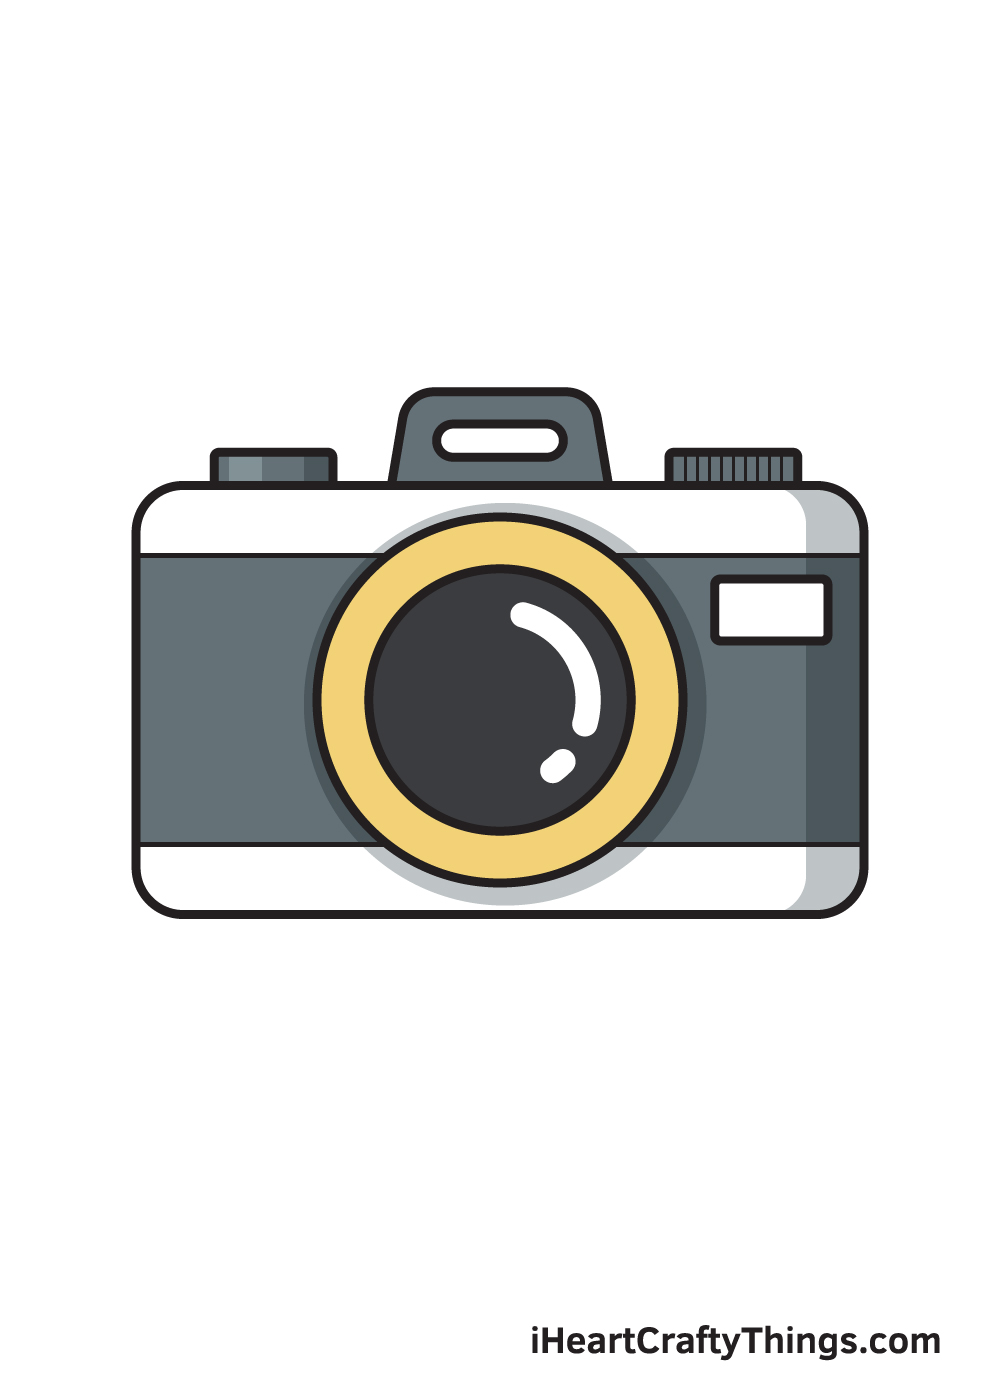
We're going to show you how to draw a camera easily, step by step. In this fun guide, we'll walk you through each part of the process to create a beautiful and realistic camera drawing. You'll discover the materials you might need, how to sketch the basic shapes, and even some clever shading techniques. Plus, we'll share some exciting ways to add extra artistic touches, so you can really make your camera drawing your own.
Table of Contents
- Why Draw a Camera? More Than Just a Picture
- Getting Started: Your Drawing Toolkit
- The Art of Camera Drawing: Step-by-Step Guides
- Beyond the Sketchpad: Using Your Camera Drawings
- Tips for a More Realistic Camera Drawing
- Frequently Asked Questions About Camera Drawing
- Your Next Step in Camera Art
Why Draw a Camera? More Than Just a Picture
You might wonder why drawing a camera is such a popular choice for artists, and that's a fair thought. For one thing, cameras are incredibly interesting objects, full of different textures and shapes. They have that classic, timeless appeal, especially the older models, which often feature a bit more character and intricate details. It's a wonderful way to practice your observational skills, too, because you're really looking at how light hits surfaces and how different parts fit together.
Beyond just the technical practice, drawing a camera can be a really personal thing, you know? It connects to the idea of capturing moments, of seeing the world. For photography lovers, it’s a way to express that passion in a different medium. Plus, once you learn how to draw a great looking camera, you can use your drawing for so many creative projects. It's really quite versatile, in a way.
Whether you want to create a camera clipart, design some fun stickers, or put together unique photography illustrations, knowing how to draw a camera opens up a lot of possibilities. It’s a skill that just keeps giving, allowing you to bring your ideas to life in a very visual way. So, let's get ready to snap a picture, as it were, with this beginner how to draw a camera tutorial.
Getting Started: Your Drawing Toolkit
Before you even make your first mark, it's a good idea to gather a few simple things. You don't need a lot of fancy equipment to start drawing, just some basic art supplies. A simple pencil, maybe a few with different lead hardnesses like a 2B for lighter sketches and a 4B or 6B for darker lines and shading, will do the trick. You'll also want a good eraser, perhaps a kneaded one that can lift graphite without smudging, and some drawing paper.
For paper, just about any type will work when you're starting out, but a slightly thicker paper, like sketch paper or even cardstock, can be nice. It holds up better to erasing and layering. You might also find a ruler helpful for some of the straight lines, especially when you're getting the basic structure down. A blending stump or even a cotton swab can be useful later for smoothing out your shading, too.
That's really all you need to begin creating a detailed, realistic camera drawing. The most important thing, perhaps, is just having the willingness to give it a try. You don't need to be an expert right away; it's all about enjoying the process and learning as you go. So, grab your tools, and let's get started on this fun guide.
The Art of Camera Drawing: Step-by-Step Guides
Now, let's get into the actual drawing part. The idea here is to guide you through every step of the process, making it feel manageable and not at all overwhelming. We'll start with the very foundations and then slowly build up to the more interesting bits. It's pretty much like building something, you know, you start with the big pieces and then add the smaller ones.
Basic Shapes for Your Camera Drawing
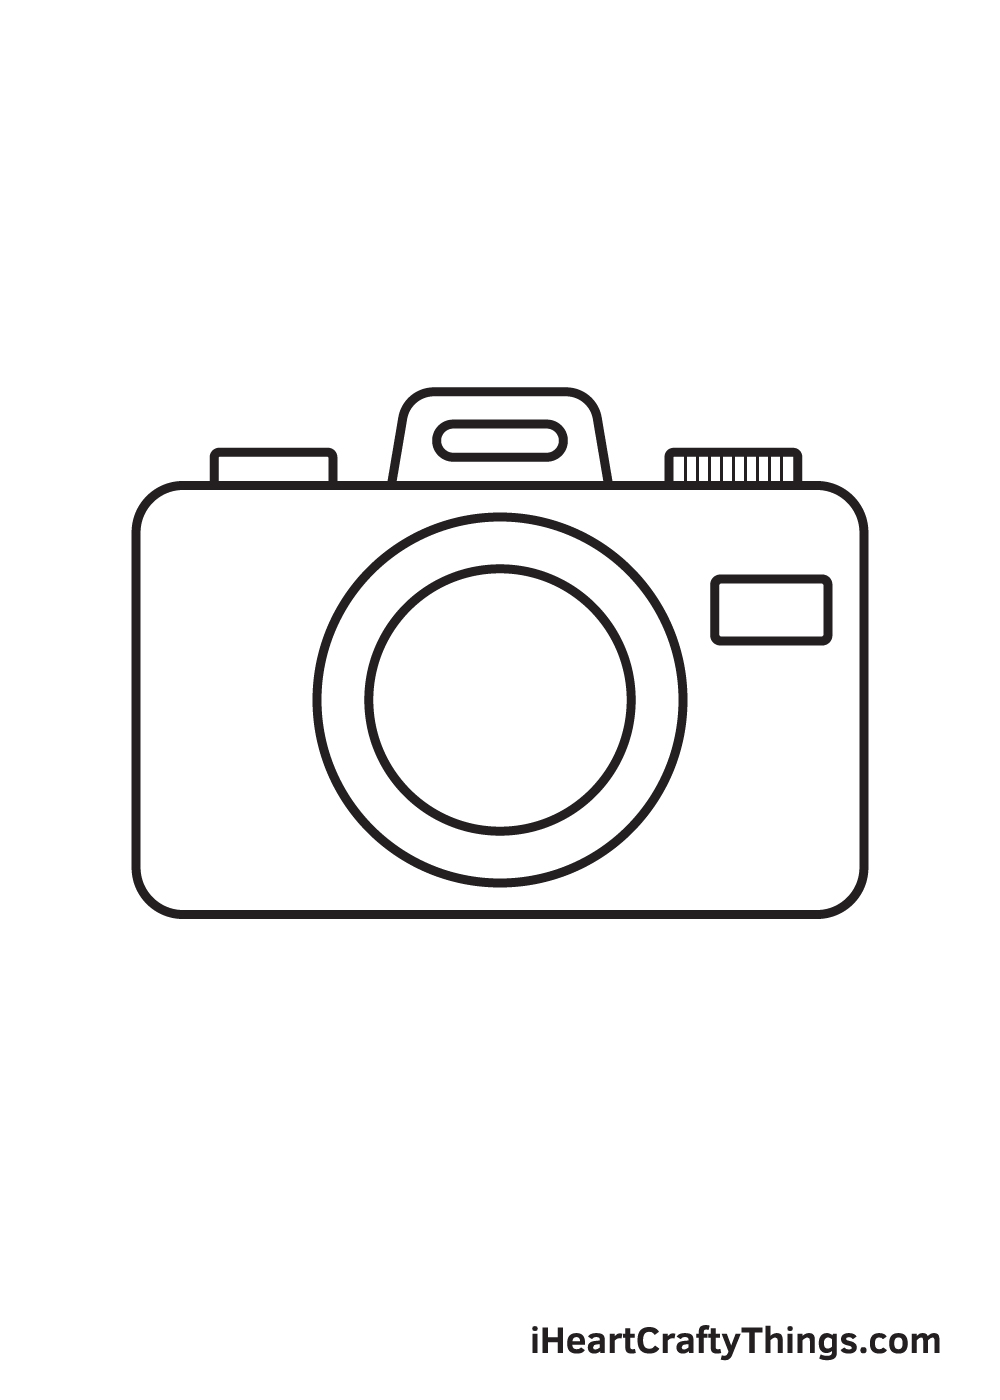
Every drawing, almost, starts with simple shapes. For a camera, you'll typically begin by sketching out the main body. Think of it as a basic rectangle or a slightly rounded box. This is your foundation, and it doesn't have to be perfect at this stage; it's just about getting the general size and placement right on your paper. You can use very light lines for this, lines that you can easily erase later.
Next, consider the lens. The lens is often a circle or a series of concentric circles attached to the front of that main body. Depending on the type of camera you're drawing, this circle might be quite large and prominent, or it could be smaller and more recessed. You'll want to place it carefully, thinking about where it sits on the camera's body. For instance, a classic SLR camera will have a very noticeable lens right in the middle, whereas a smaller point-and-shoot might have a more subtle one.
After the body and lens, look for other major components that can be simplified into basic shapes. Perhaps there's a smaller rectangle for the viewfinder on top, or a square for a flash attachment. These initial shapes are like your skeleton for the drawing. They help you get the proportions right before you add any of the fine details. By following these simple steps, you too can easily draw a perfect camera, starting with these very fundamental forms.
Adding Details and Shading Techniques
Once your basic shapes are in place, it's time to bring your camera drawing to life with details. This is where you start refining those initial lines. Think about the buttons, dials, and straps that make a camera look real. You'll want to carefully draw the outlines of these smaller elements, paying attention to their size and position relative to the main body. For example, a shutter button is usually a small circle on the top, and it often has a slightly raised appearance.
Shading is what gives your drawing depth and makes it look three-dimensional. It's all about showing where light hits the camera and where shadows fall. Imagine a light source in your mind – is it coming from the top, the side, or perhaps a bit from the front? Areas facing the light will be brighter, while areas away from it will be darker. You can use different pencil pressures to create a range of tones, from very light gray to deep black.
To shade, you can use techniques like hatching (parallel lines), cross-hatching (intersecting lines), or blending (smoothly transitioning tones). For instance, the curved surface of a lens might have a subtle gradient of shade, while the sharp edges of the camera body could have more defined shadow lines. Don't forget to add reflections on shiny surfaces, like the lens glass, which can make your camera drawing look incredibly realistic. Discover drawing instructions and tips to create a realistic camera illustration, especially by focusing on these subtle light and shadow plays.
Drawing Different Camera Styles: Three Versions
The cool thing about drawing cameras is that there are so many different kinds, and each has its own unique charm. In this article, we'll describe how to draw a camera in three versions, giving you a good range of options. It’s pretty fun to draw an old camera, so we'll definitely cover that classic look. You'll learn how to create a beautiful and realistic camera drawing for each type.
First, let's consider the classic, vintage camera, perhaps a rangefinder or an old SLR. These often have a very distinct, somewhat boxy shape, with a prominent lens and perhaps a large viewfinder on top. They might have textured grips, a lot of visible dials, and maybe even a leather strap. When you're drawing one of these, really focus on those unique details that give it character, like the little numbers on the aperture ring or the specific shape of the film advance lever. It's all about capturing that nostalgic feel, you know.
Next, we can look at a more modern digital single-lens reflex (DSLR) camera. These tend to have a slightly more ergonomic, curved body, often with a large grip on one side. The lens is still a key feature, but you'll also notice things like an LCD screen on the back, a hot shoe for a flash, and perhaps more subtle, recessed buttons. The lines here are often smoother, and the overall form is a bit sleeker. Pay attention to the slight angles and how the different parts flow into each other.
Finally, we could explore a compact mirrorless camera or even a smartphone camera, which is a camera in its own right. These are much smaller, often very flat, and can have a more minimalist design. The lens might be smaller or even integrated seamlessly into the body. For a smartphone, you're essentially drawing a sleek rectangle with a tiny, precise circle for the camera lens and perhaps a small flash next to it. This version focuses on simplicity and clean lines, which can be a fun challenge in itself. Look and draw a beautiful camera with ease, no matter the style you pick!
Beyond the Sketchpad: Using Your Camera Drawings
So, you've spent time creating a fantastic camera drawing, and that's really wonderful. But what else can you do with it once it's finished? The possibilities are actually quite broad. You can use your drawing to create a camera clipart, for example, which is great for digital projects or presentations. Just scan or take a clear photo of your drawing, and then you can use it in various software.
Another fun idea is to turn your drawings into stickers. There are services online that can print custom stickers from your artwork, or you can even do it yourself with special sticker paper and a printer. Imagine having little camera stickers to decorate your notebooks, water bottles, or even your actual camera gear. It adds a really personal touch, doesn't it?
Your camera illustrations can also be used for photography-related projects. You could design custom greeting cards for photographer friends, create unique social media graphics, or even make your own art prints to hang on your wall. They can be part of a larger composition, too, maybe alongside other objects that relate to photography or travel. It's all about letting your creativity flow and seeing where your camera drawing takes you. Learn more about artistic expression on our site, for more ideas.
Tips for a More Realistic Camera Drawing
To make your camera drawing truly pop and look realistic, there are a few extra things you can keep in mind. One very important tip is to observe real cameras, even if you don't have one right in front of you. Look at pictures online; notice the way light bounces off the different materials, whether it's the smooth plastic, the shiny metal, or the textured grip. This observation will really inform your shading and detailing.
Another thing to think about is perspective. Even if you're drawing a simple front view, understanding how lines converge slightly can make a big difference. For instance, if you're drawing a camera from a slight angle, the sides will appear to recede into the distance, making them look shorter. This subtle detail adds a lot of realism. Don't be afraid to use a ruler for initial guidelines to keep things straight, and then freehand the details.
Also, consider the textures. A camera isn't just one smooth surface. It has a variety of textures: the smooth glass of the lens, the matte finish of the body, the tiny ridges on a dial, or the fabric of a strap. You can suggest these textures with your shading and line work. For example, very fine, close lines can indicate a rougher texture, while smooth, blended tones suggest something sleek. Adding these little touches, in a way, really elevates your drawing. Discover the materials needed, basic shapes, shading techniques, and tips for creating a realistic camera drawing, all these elements working together for a great outcome.
Frequently Asked Questions About Camera Drawing
People often have similar questions when they're starting out with camera drawing, and that's completely normal. Here are a few common ones we hear, which might help you too.
How do you draw a simple camera?
To draw a simple camera, start with a basic rectangle for the body. Then, add a circle for the lens on the front. You can then put a smaller rectangle on top for the viewfinder. Keep the details minimal, just adding a small button or two. Focus on clear, clean lines rather than complex shading. It's all about getting the main shapes right first, you know?
What are the basic shapes of a camera?
The fundamental shapes for most cameras are a main rectangular or box-like body, and then a circle for the lens. Beyond that, you might have smaller rectangles for viewfinders or screens, and tiny circles for buttons or dials. These simple geometric forms are your starting point for building any camera drawing, whether it's an old one or a modern one. They really are the building blocks.
How do you draw a vintage camera?
Drawing a vintage camera involves focusing on specific details that give it that old-fashioned charm. These often include a more prominent, perhaps larger, lens, distinct dials and knobs on the top and front, and maybe a textured or leather-like finish on the body. Think about the classic film advance lever or the specific shape of an old rangefinder. Adding subtle wear and tear through light shading can also make it look more authentic, too. You can find more ideas and inspiration on drawing vintage items here.
Your Next Step in Camera Art
We've gone through a lot of ground, from understanding the basic shapes to adding those clever artistic touches. You've learned how to sketch the main forms, how to bring in details, and even how shading can make your camera drawing look truly real. Remember, it’s all about taking it one step at a time, and every line you draw is a step forward.
The best way to get better at camera drawing, or any drawing really, is simply to practice. Don't be afraid to experiment with different camera styles, try out various shading methods, and just have fun with it. Each drawing you create, whether it's a quick sketch or a detailed illustration, helps you improve your skills. So, pick up your pencil and paper, and just start creating.
You're now ready to look and draw a beautiful camera with ease. The goal is to enjoy the process and see what amazing camera art you can bring to life. Happy drawing!

Detail Author:
- Name : Bettie Dooley
- Username : vroberts
- Email : abner.kohler@yahoo.com
- Birthdate : 1991-03-01
- Address : 7660 Buckridge Port Swiftbury, SC 56948-4116
- Phone : 580-296-6251
- Company : Kuhic, Kessler and Nienow
- Job : Annealing Machine Operator
- Bio : Nihil dignissimos ut et eaque autem. Cupiditate quos voluptatibus veniam enim autem odit fugiat. Deleniti voluptas hic porro officiis odio vero. Quos earum adipisci beatae cumque debitis officia.
Socials
twitter:
- url : https://twitter.com/brycen_reilly
- username : brycen_reilly
- bio : Ea dolorem ut ipsum eos. Minima delectus ut magnam tempora doloremque ex. Est et consequuntur sunt similique nemo exercitationem aut ratione.
- followers : 308
- following : 1745
facebook:
- url : https://facebook.com/breilly
- username : breilly
- bio : Soluta sapiente illo accusantium omnis ipsum ratione.
- followers : 4922
- following : 2806
instagram:
- url : https://instagram.com/brycen_reilly
- username : brycen_reilly
- bio : Soluta saepe vel id. Veritatis asperiores minima nihil ut eum.
- followers : 3767
- following : 1790
linkedin:
- url : https://linkedin.com/in/breilly
- username : breilly
- bio : Similique et modi eum aliquid ut.
- followers : 3440
- following : 2577
tiktok:
- url : https://tiktok.com/@reillyb
- username : reillyb
- bio : Voluptates alias ut ab modi quis adipisci.
- followers : 556
- following : 1977
